Showing posts with label cupcake toppers. Show all posts

Wednesday, 11 June 2014

Summer Grillin' - Cupcake Style!

 
Summer is here and it is most definitely BBQ season!.. More than it usually is in our house anyway!
 
We celebrated our friend's 30th birthday the other day with lots of delicious bbq food and a great evening, topped with a donut tower birthday cake (what a great birthday when it lands on National Donut Day!), cake and then also more cupcakes from me!  Perfect!
 
I went with the BBQ theme seeing as that's what we were going for, and it is the season after all! 


Using the same recipe for Coca-Cola Cupcakes as my New Home Cupcakes over a year ago, I thought it was time to use this recipe again, especially as the birthday boy is a fellow coke lover.  They're a little different to regular "cupcakes", with a super dense cake part, and a delicious glaze - with no swirl of buttercream.  This meant I wanted cupcake toppers that were flat, 2D rather than 3D ones so it would lay flat on the surface of the cupcake glaze.
 
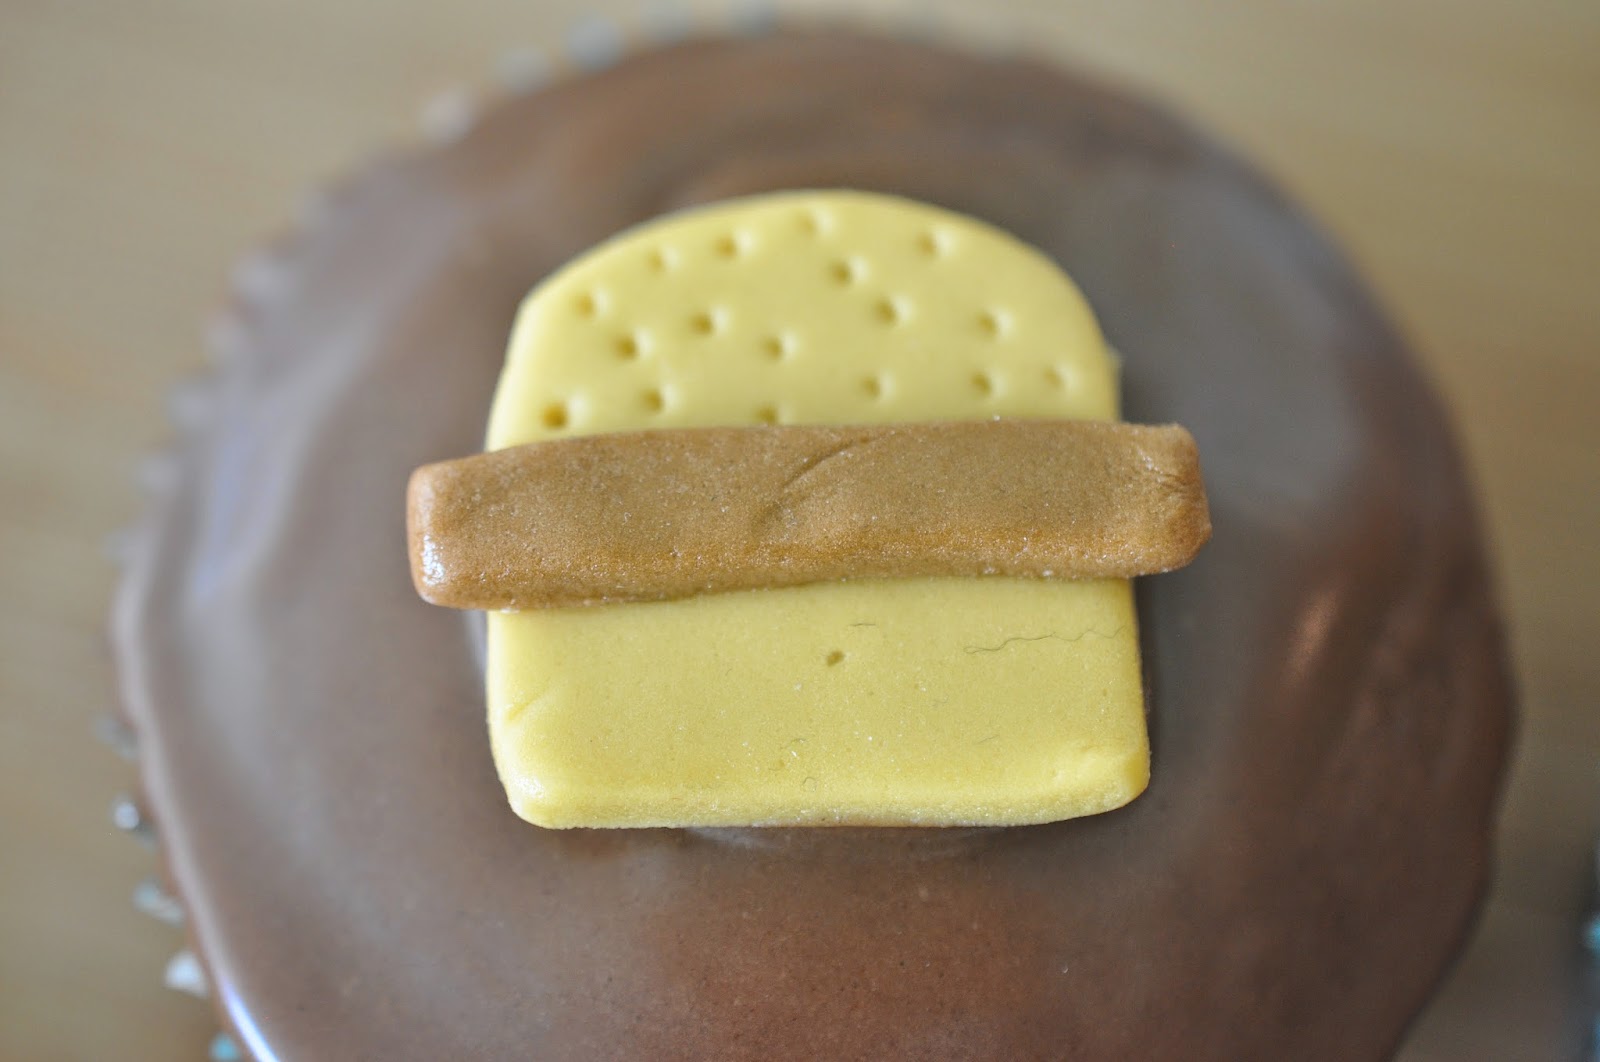
So I got to work creating the BBQ themed fondant cupcake toppers.  First up were the burgers.  These were my first idea, and the one I definitely knew how it should look.  I coloured small amounts of fondant a brown colour for the burger, and then a yellow-brown colour for the bun, and used a sharp end of a cake decorating tool to make little "sesame seed" indents.
 
 
Next was the ketchup and mustard!  A little out of scale compared to the burger, but who wouldn't rather have a big burger!?
 
 
Then the choice was between making a '30' cupcake with some birthday decorations, or doing a third BBQ topper.  I went for a third design on the same theme, tying it all together with some corn!  Green and yellow fondant coloured and then cut out with various parts of cookie cutters to get the shapes and sizes I wanted.  The green part came from a maple leaf cutter, and the corn part from the little finger on a high-five hand cookie cutter.  Just using what I had instead of free-styling the cutting!  Then I used the end of a cake decorating tool that looks like a scalloped shell on the end to create the texture of corn.


 Fondant cupcake toppers all done - giving them a little chance to dry out/harden slightly through the morning.  This was some seriously early cupcake prep - after not getting back to sleep at 5.30am on a Friday where I wasn't working, I decided the only way to be productive that day was to just accept that sleep was done for the day and I might as well start baking!

 
So, with the Coca-Cola cupcakes baked, and cooling, and the glaze deliciously smooth ready to be spread over the cupcakes - see the recipe here - it was time to decorate!


The great thing about decorating with cupcake toppers when they are already made is that, once the cupcakes are baked up, everything is ready to go!  Assembly is nice and easy, and in fact, it made the early baking wake up worth it!

As the recipe is already on an old post, all that is left to share are some close ups of the cupcakes, and more photos!


Which is your favourite design of the 3?  I think I still love my original idea of the burger, but I also am really pleased with how the corn turned out!


Perhaps you'll give them a bake this weekend for Father's Day, or for a BBQ Birthday coming up this Summer!  Have fun with fondant cupcake topper prep - and then enjoy how easy everything is to put it together once you're done baking :)   I'd love to see your BBQ cupcakes if you try them!!
 
Happy BBQ Season!!

Monday, 20 January 2014

1 Year Celebration!

I cannot believe it!  This week marks my blog's 1st birthday... 1st anniversary... Whatever the real term for my blog being public for 1 year now.  I have written a post every week for 52 weeks, occasionally a couple per week!  I have gotten better at taking photos specifically for tutorials on the blog, or for showcasing some of my favourite bakes and makes.  I have built up my Facebook, Pinterest and Instagram followers, and love to share what I've been up to with you all!  I have been lucky enough to be featured on some amazing blogs, and am so happy you have enjoyed the things I have created!

So this week, to say thank you to you my readers and supporters, just for now this is a little post to let you all know I'M HAVING MY FIRST CUPCAKE COMPETITION!  ... I'm excited y'know!


In celebration of my year of blogging, I am doing a 'Cupcakes By The Dozen' giveaway through my Facebook page.  Click here and take a look at how to win.  Like the page, share the photo and tell me your favourite cupcake flavour is all you need to do.  ... Because really, who doesn't like cupcakes?! 

I truly love to bake cake.. did you know?!  The collage shows 12 of my favourite cupcakes I have created over the past year.  You could win a dozen cupcakes in your favourite flavour, if you're a local... Or if not - I'll mail out some fondant cupcake toppers! 

Help me celebrate with this small, but fun giveaway!

And for a true Sew Lah Tea Dough blog post, check back later this week for something delicious I can't disclose just yet! 

Monday, 30 September 2013

Creating and Cake-ing for Choir ♫

Firstly, here's a big oops for only just writing this blog post!  It is Monday afternoon, which means this post definitely didn't go live on either Saturday or Sunday this weekend.  My bad!  Everything went a little crazy and busy and I'm finally getting a chance to write it before I dash out to teach this afternoon.

Today I'm going to tell you about a couple of musical things I have put together recently for my choir.  I'm a piano and music teacher primarily, but I sing with a really great chamber choir - the Cantabile Chamber Singers here in Toronto and we started back at rehearsals a few weeks ago.


I did a quick bake on a Tuesday morning so that we would have some sweet snacks for our first rehearsal break.  Why?... Because chats and catch ups are better over cake of course!  Anddd, well, with the morning off work I could think of nothing more fun than doing a spot of baking :)


I made some mini cupcakes and decorated them with some leftover cola buttercream from the Back to School cupcakes I made earlier in September - click here to see them and to find the recipe!  I used the same amounts as I did for the 12 regular sized cupcakes, and then following the same recipe it also made the 24 mini cupcakes.

To decorate I used this amazing design of rice paper cupcake toppers my little sister bought for me last year for my birthday!  I'm a weirdo and hate using up things, so I save them and save them until I can bear to be apart from them once they're all used up!  Funny story.. I only used 1 package of these, using a second pack of small blue ♫s for the rest (with a little water icing once the buttercream had run out!)... so GOOD NEWS I still have one pack left!

Thanks Livi and Simply Topps for these.  They were the perfect size for these mini cupcakes sat on a buttercream swirl (Wilton piping tip #12).  And the designs were fabulous, especially for this musical occasion.  Check out their website, they have some great cupcake toppers that make those quick baking projects nice and easy :)


Batter made and prepped, scooped out and ready to go in the oven!...


Slightly less time than in this recipe as they're smaller, 10 - 12 minutes will probably do it but do keep an eye on them.


I chose these black and white polka dots to go along with the colour scheme of the music notes toppers.  And here they are, piped and decorated, ready to be eaten at rehearsal :-)


And the second part of this post starts now!  Just a little crafty make I put together this weekend for our annual choir meeting which this year involved the usual business meeting and pot luck but also some super fun lawn bowling, and board games evening!  A lot of fun, and great to spend time with the choir away from rehearsal.

I made a bundt cake for the occasion, but well you'll have to wait another week or so for that post!  But you do get a little sneak preview of what it looks like when I show you the music cake bunting I made for it!  It was a kind of party and get-together after all so why not celebrate :-)


To make this cute little music bunting you need some really basic supplies you might even already have at home!  

Sadly I was on a time crunch and didn't get a chance to take photos as I created this bunting, but here's a run down of the steps and hopefully you can picture it!

To create the pennants I used black cardstock and a sheet of music scrapbook paper (thank you Michaels of course!)... They were 3cm across the top and 4 cm long.  I find it nice and easy to cut these out by marking the 3cm marks along the card, and then the 1.5cm points alternately which means using a paper cutter (or scissors) you can just angle the cutter from a 3cm mark to the opposite 1.5cm mark and then back creating the triangles as you cut!

As I had made a bundt cake I wanted the poles holding up the bunting to stand up quite a bit from the cake.  I used white lollipop sticks I already had from this project for my piano students!

But how to connect the flags to the poles!?  I was thinking about baker's twine, but the colours I had weren't matching enough for me... and then I had some music tape to fold over and attach that way, but I didn't like that either.
So, needle and thread to the rescue I used some black and white embroidery thread and threaded both pieces through a wide needle.  I tied one end to one stick and then threaded through each of the two top corners of the pennants, choosing to thread from the back and across the front so you could see the two-coloured thread against the card flags.  Finishing the 7 flags I tied it off at the other end, loose enough to have a little dip but not so much so it would drag on the cake!  


It really added just a little something to the cake, and everybody knew what contribution to the potluck mine was.  After all, I'm the strange one wanting to add decorations to a bundt cake just because! Hehe ♫

This little bunting was easy to put together, and you can chang up the flag designs SO easily with different patterns of scrapbook paper - and there are endless possibilities.  And, so long as the cake wasn't too messy or sticky inside these are reusable too!  Added bonus :)

I'll for sure be making many more of these now I have tried it so watch this space!  Have a great week everyone!