Sunday 31 March 2013

Hand Stitched Easter Cards

HAPPY EASTER!!!

I hope you are all having a wonderful Easter weekend :-)  I've had a fantastic time making, baking, enjoying time off and generally being busy with lots of fun activities in preparation for this weekend.

I can't decide what I am most pleased with this week, the Simnel Cakes I baked, or these cards... I am SO pleased with how these turned out, and even more pleased that the ones I sent to England (and worried wouldn't make it) actually got there many days early, in plenty of time for Easter!


I had been thinking of doing some kind of sewing on cards for a while now... after sewing my felt Christmas star and dog ornaments for the name places at our Christmas dinner I love the simple back stitch and the effect it creates.  So there must be a way to create an equally effective stitch but on cards!

Cards have been my long time crafting love (I have a LOT of archived photos that one day will be blogged!)  Sewing is fairly new... baking still a long time but cards probably has been around the longest for me so I am very pleased to have thought of this new way of creating cute cards that really could be changed for any occasion.

Here's a mini how-to...

I had picked up a stack of pastel cardstock from Michael's a few weeks ago and I knew I wanted to use it for my Easter cards this week.  A quick chop, a score along the middle and the cards were cut and ready to go.

I used a lace-like tape for the bottom border and then got to work on the Easter shapes.


Starting with the easiest one, the egg!  I used a cookie cutter for this.  I lightly traced the outline onto the card,  made pinpricks all around this template and then erased the pencil.


Next it was time to sew!  I used some complementary coloured threads, all Easter/Spring appropriate!  But of course if you want to go brighter, or bolder you can change this up however you like!  I backstitched along, and kept the two knots small and tight so that the back of the card didn't look messy.


For the bunny I didn't have a cookie cutter in this shape (only a larger whole rabbit that I used for my Easter sugar cookie treats last year) so I just freestyled this a little.  I drew it on paper and when I was happy with the shape and size cut it out as a template to use each time.  No risk of them being different then!


Bunny, meet Bunny - a cute gift from Mum after she visited
Canada Blooms in Toronto on their visit in March  last year!

The final shape I did was a chick, I partly used a cookie cutter for this one, but it had no legs!!  So of course I had to add these.  This one took the longest to sew for sure but in front of the tv, time didn't really matter.


All written and ready to go.  I love how versatile this design of card can be.  I have already made a white bunny on pink card for my boss who just adopted a little girl :-)  They will definitely be made for baby showers, births, and birthdays in the future... watch this space for more designs soon!!


All the cards and all the props hehe! 

I'm totally enjoying all of the new Spring like projects I've been seeing on lots of blogs this week... Feel free to leave a comment and a link to your newest Spring creation :-)  Have a great Easter!!  Thanks for reading ♫

Saturday 30 March 2013

A Taste of Britain: Easter Simnel Cake

Easter time!!  I have just finished baking and decorating my second Simnel Cake of the season, cards are made, our home is decorated and we had a LOT of fun making salt dough decorations and painting eggs last night!!  We are well and truly ready for Easter Sunday tomorrow :-)  Unusual for a Saturday I know, but here I am blogging - with all of these fun Easter makes and bakes I have rather a lot to tell you about, so I'll start with the Simnel Cakes today to get your taste buds ready for all of the sweet treats and cakes you'll no doubt be devouring tomorrow!


I am super excited this year to have made not only the traditional Easter cake for a family lunch tomorrow but also to have made another last Saturday that I made and decorated in order to sell at my choir's silent auction, fundraising for Festival 500 (Check our choir out here!) .  There were quite a few bidders looking at it and bidding - I started off the bidding at $25 and eventually it crept up to $65 which I am pretty pleased with! Yey!  ... Next step, making and selling them for real, but that's another day.

For this classic cake I used a classic recipe from Delia Smith.  I looked into various different recipes but liked the sound of this one the most - in particular the marzipan chunks that went into the cake, not only in decoration, but INTO the cake mixture!  Yum!

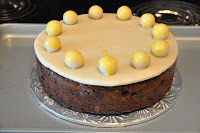
Before the recipe, and the photos I also just wanted to share some of the history of Simnel Cake - a lot of the reason why I love this cake.  Traditionally this cake used to be made in time for Mothering Sunday - the 4th Sunday in Lent (not the Mother's Day of North America in May!)... It is said that young girls in service would make the cake for their mother's when they had the day off to return home for Mothering Sunday.  Should the cake last until Easter Sunday and still taste good they were credited as being a good cook!  And why the marzipan balls on top?  These are the religious symbolism of this traditional cake - the 11 balls on top of the cake represent the 11 Apostles to Jesus at the time of his death and resurrection.  So a little British history in the light fruit and nut cake as well as being a great representation of the Easter story!

So I altered Delia Smith's recipe just slightly, as I used a 9" Springform pan so I will give my ingredients based on what I did (but you can find the original here).  I also did my own decoration, not the woven basket and fondant she did, even though that looked so great as well!

Ingredients:

112g whole blanched almonds
562g marzipan for cake (281g for cake, and upto 281g for decoration)
253g plain flour
3 slightly heaped teaspoons baking powder
1 slightly heaped teaspoon mixed spice I used Pumpkin Pie spice as I can't find mixed spice ANYWHERE in this country!
169g soft brown sugar light soft brown sugar
169g unsalted butter, well softened
35ml milk
3 large eggs, beaten
1 egg yolk, beaten
462g mincemeat
56g whole candied peel, chopped
394g mixed dried fruit I used a ratio of 2:1:1 raisins:sultanas:currants
Grated zest of 1 big orange
Grated zest of 1 big lemon
Icing sugar for dusting
1 dessertspoon redcurrant jelly 

Method:

Spread almonds on a baking sheet and place in a pre-heated oven (400°F/200°C) for 8-10 minutes, until golden brown.  Take out of the oven and lower the temperature to 300°F/150°C!.  When the almonds are cool, chop them roughly.

Take half of your marzipan and cut into 1cm cubes.  Toss in 1 tablespoon of the flour.

In a large mixing bowl (I did all this with the stand mixer) sift the flour, baking powder and spice in, then simply place all the ingredients (EXCEPT the marzipan, icing suar, icing, redcurrant jelly and egg yolk) into the bowl.

Mix until it is all perfectly and evenly distributed.  Finally, gently fold in the squares of marzipan and any remaining flour.

Spoon the mixture into the prepared tin (9" round Springform pan, greased and lined with parchment paper - bottom and sides).  Also place parchment paper with a hole the size of a 50p piece on TOP of the cake.

Place cake on the centre shelf of the oven and bake for 2 3/4 - 3 1/4 hours at the lower temperature of 300°F/150°C.  My oven/cake only took 2 1/2 hours so perhaps take a look at yours after that time too!   The cake is cooked when the centre feels springy when lightly pressed.

When it is cooked, leave it in the tin for 30 minutes before turning it out onto a wire rack to cool.

For the decoration:

I firstly attached the cake to the silver 10" board with royal icing (Egg white and icing sugar whisked until desired thickness).  Also turn on the grill (broiler) ready for later...


Dust working surface with icing sugar and roll out rest of marzipan until you have around 1/4 - 1/2 inch thick 9"round of marzipan.  I use the bottom of my springform pan to measure this and then a pizza cutter to cut around it.

Spread redcurrant jelly on top of the cake and place marzipan round on top of the cake.


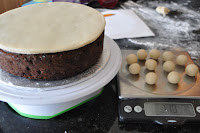
With remaining marzipan roll out 11 x 10g balls.  I did these one at a time weighing as I went... I REALLY wanted these all to look the same, can you tell?!

Glue these around the cake with a small amount of royal icing. 

Beat the egg yolk and spread on top of the marzipan.

Now the nervy part!  Place the cake on a baking sheet and put under the grill and WATCH LIKE CRAZY! The first time I did this last week I was under the impression it would take less than a minute - Delia suggests only 30 seconds under the grill... I literally don't think I breathed that whole time.  Alas, perhaps my centre of the oven was not close enough, or maybe a gas oven gives off more direct - I don't know.  What I do know is I was looking at around 4 minutes to get a golden brown lightly toasted look to my marzipan.

... and breathe!

Get to work on your fondant flowers (or any other decoration you like....if any) while you leave this to cool down and re-set.


I coloured some Wilton fondant and made some small flowers and some even tinier ones, glued with royal icing and arranged in a kind of cascading effect around the inside of the cake.  But of course you can do any number of different decorations, just google image search Simnel cake - you'll see nests with mini eggs, baskets, the fuzzy yellow chicks placed on top, or simply just the marzipan and balls!  The possibilities are endless you could say!


I'm excited to eat and share this tomorrow and had a LOT of fun making it.  Have a fantastic long weekend everybody, I'll be back tomorrow with more Easter blogging!


Monday 25 March 2013

New Home Cupcakes

Amidst all of this new Spring season of baking and making, and after some busy St. Patrick's Day/Easter preparations I have something different to tell you all about... even if this post is a couple of weeks late :-)

...and now even later thanks to our internet and cable being down for 18 hours BOO! Anyway, it's here now!

We caught up with some friends at the beginning of March and went to visit their new place as they have moved back to Toronto.  We enjoyed some delicious food and played some games - a perfect evening!!

A new home meant a new idea for me to try out.  I wanted to bake some dessert for our dinner, as well as give a housewarming edible gift and here's what I came up with ... 


As I mentioned in my St. Patrick's Day post, I've been more excited by cupcakes recently and experimenting with various decorations to go on top - a little more than just frosting and piping.  I decided that a theme of 3 things would work nicely together and wanted to do all of these with fondant icing.  I then had to decide what flavour the cupcakes had to be!... I knew that my chocolate and mint cupcakes were coming up so I didn't want to do those twice in one week, and I also didn't want to only do a vanilla ... 

Then an idea came to me - I had heard and read about coca-cola cakes but had never tried one, either in taste or in baking!  So I did a little reading and research about it and noticed that there were two main ideas regarding them - one more sweet sounding than the other.  I went with the one that sounded not as rich and sweet as the other and in fact was Nigella Lawson's recipe that I read good reviews/comments about so was happy to try that.  I also liked the idea that the glaze had a good coca-cola flavour to it, and also would leave a good flat surface for the fondant cupcake toppers I created.  

Cakes all baked and ready to be glazed.
I definitely preferred the cupcakes that didn't dome over the
top of the case,the flat surface meant for a
good spread of the glaze.
Apologies I definitely forgot to take photos of the glaze as I went along, but hopefully you can see how it turned out on top of the finished product!

For the fondant cupcake toppers I chose a house, a key, and a plaque reading 'Home Sweet Home' and created this out of Wilton roll out fondant.  For this I only needed a tiny bit of fondant... I played around a little with the colouring, I mainly used a brown, a black and a yellow/brown colour for these small pieces.  I used a food decoration marker for the Home Sweet Home writing, and a dark chocolate and white chocolate writing icing pen for the windows and door on the house.  Kind of fiddly, but I love the detailed work that brought it all together.


All the cupcake toppers assembled, the cakes were cooled and glazed and all put together to create 12 cupcakes ready for our get together the next day.  Sadly I couldn't make them the same day as I had music classes all morning, and the first Toronto FC game of the season to attend in the afternoon!!  Which did mean I trusted Jonathan to get them to me safely after work without anything bad happening to them, and phew... all arrived safe and sound :-)


The cupcakes were SO moist, and so delicious!  I almost can't call them cupcakes as they were very different to a traditional spongey bouncy cake you usually think of for a cupcake.  But, they were in cupcake form so I will continue to!  The chocolate/cocoa powder was definitely the primary flavour you tasted, but the Coke definitely added to the moist and dense texture of the cake (something kind of like a steamed pudding).  The Coca-Cola taste definitely came through more in the glaze which, with that butter and icing sugar was of course, all of the deliciousness!  

Definitely something different with this Coca-Cola cake, but a fun one to try and a delicious one to eat!  Keep reading to see the recipe below...


My favourite one, the little house.
 
And here's the recipe, very slightly adapted from Nigella Lawson's Coca-Cola Cake.

For the cupcakes:
200g (7 oz) plain flour
250g (1/2 lb) golden caster sugar (I actually used white granulated superfine sugar, and all was okay!)
1/2 teaspoon bicarbonate of soda
1/4 teaspoon salt
1 large egg
125 ml (1/2 cup) buttermilk
1 teaspoon vanilla extract
125g (4 oz) unsalted butter
2 tablespoons cocoa powder
175 ml (3/4 cup) Coca-Cola

Nigella suggests using a 22-23 cm springform cake pan, lined with foil to prevent the batter leaking, then greased but I used a 12 cup cupcake tin (and a few extra silicone cupcake cases) to make 16 cupcakes lined with cupcake cases, in red and white to go along with the Coca-Cola theme!

For the icing:
225g (7 oz) icing sugar
2 tablespoons (30g) butter
3 tablespoons (45ml) Coca-Cola
1 tablespoons (15ml) cocoa powder
1/2 teaspoon vanilla extract

1.  Preheat the oven to 180°C/ 350°F
2.  In a large bowl, combine the flour, sugar, bicarbonate of soda and salt.  In a measuring jug beat the egg, buttermilk and vanilla.  For this recipe I just went old school and used a mixing bowl and wooden spoon instead of using the Kitchen Aid stand mixer like I usually do!
3.  In a heavy-based saucepan, melt the butter, cocoa and Coca-Cola, heating it gently.  This frothed up like crazy which was very cool!  Pour into the dry ingredients, stir well with a wooden spoon, and then add the liquid ingredients from the jug, beating until it is well blended.
4.  Pour into the prepared tin and bake on the warm sheet for 40 minutes or until a tester comes out clean.  As Nigella did 1 cake in a large tin her cooking time of 40 minutes was longer than my 16 cupcakes.  I reckon mine were in for around 20 minutes, but definitely check them!
5.  Leave to stand for 15 minutes in the tin before unmoulding, then unclip, unwrap and turn out on a wire rack, making sure you've got a sheet of newspaper of something underneath the rack to catch any icing that drips through.  For this step I just removed the cupcakes from the tin and left to cool on a wire rack, I did also put a baking sheet underneath to catch any drips but I got to miss the steps to do with the Springform tin.
6.  Sieve the icing sugar and set aside.  In a saucepan, combine the butter, Coca-Cola and cocoa and stir over a low heat until the butter has melted.  Remove from the heat, add the vanilla and spoon in the sieved icing sugar, beating as you do so, until you have a good, spreadable, but still runny, icing.
7.  Pour icing over the cake while the cake is still warm, spread gently and leave till cool before transferring to the serving plate.  At this point I also topped the cakes with the fondant decorations before the glaze had completely cooled so they could set into it slightly.


Happy New Home guys!  Thanks for having us over :-)

Sunday 17 March 2013

St. Patrick's Day Mint Chocolate Cupcakes ♧ ♧ ♧ ♧ ♧ ♧ ♧ ♧ ♧ ♧ ♧ ♧ ♧ ♧ ♧ ♧ ♧

Happy St. Patrick's Day everyone!

Ireland, and Dublin in particular is one of my favourite places in the world.  My Grandparents lived there since my Dad was at university and so I have spent all of my childhood visiting, and now whenever I go back to England to visit I make sure I ALWAYS get to Dublin to go back, to see my Granny, to wander around the city and enjoy it!  I've even been lucky enough to spend time there during St. Patrick's weekend, the parade there was incredible :-)

Since moving to Canada, I have discovered that North America LOVES St. Patrick's Day - perhaps more than England does?!  You all go nuts for it!  I have no problem with that, I love it too.  What a fun celebration for the patron saint of Ireland.

Last week I got crafty and made my Lucky Pocket Sneakers and Shamrock bunting, see that post here but this weekend I have been baking!

I'm been on a cupcake roll recently... I have some I still need to post up from last week but for this weekend I went on an Irish/ St. Patrick's Day theme and made some chocolate mini cupcakes with a mint buttercream frosting.  I decorated them with some green decorations, and my favourite part - the fondant shamrocks :-)

Michael's served me well with a new set of mini cupcake cases, the green spotty ones were perfect for this project!


I used a basic cupcake recipe (see below) and substituted some cocoa powder for some flour for the chocolatey taste!  For my mini cupcake tray (makes 24) I used my small cookie scoop, not quite filled, as I didn't want them to be too overflowing when they had risen. 


I was trying to think of adaptations of a mint chocolate chip idea and thought that a chocolate cupcake, with buttercream frosting made to be a mint flavour would do the trick :-)

I used 3 different tips to decorate, a small round one (Wilton # 12) to make a base for the fondant shamrocks, an large inverted star (Wilton # 2D) to create swirls that the green sugar would be sprinkled onto, and a star tip (Wilton # 21) to create a swirl that looked good enough (well on some it looked okay enough!) to leave blank.

My general idea was to create variations on a theme and I'm pretty pleased with how they turned out.

That is to say, I was not too happy at the start of my piping, but once the toppings and decorations were on I was pleased with how they looked!


I am MOST happy with the shamrocks.  Originally I was thinking I would have to cut out the shamrocks free hand out of the green fondant, then sometime this week I had a brain wave.  Earlier this month I picked up a lot of cheap Wilton baking accessories: a star hand punch, various stamps for decorating cakes, a crimper for fondant and also a heart hand punch!  This would be PERFECT!  All I needed was the green fondant rolled out, then I could punch out my little hearts and use three to make the shamrock!  I crimped the rest of the fondant to and ripped apart the strips it made, cut them short and used those for sturdy stems!  And there I had the perfect size shamrocks for these mini cupcakes.


I hope everyone has had a wonderful March Break if you were off school, and a fun filled St. Patrick's Day!  I know the crafts and baking I have seen on blogs and link parties this week have been SO great - can't wait to see more of your creations next week :-)


Chocolate Mini Cupcakes Recipe (makes 48 mini cupcakes plus 3 regular sized cupcakes, just for tasting!)

230g unsalted butter, softened
230g caster sugar (I used superfine granulated)
4 eggs
230g self-raising flour BUT sub out 4 tablespoons floor, and add 4 tablespoons cocoa powder
1 teaspoon vanilla extract

1.  Preheat oven to 375°F/190°C
2.  Cream together butter and sugar until light and fluffy
2.  Add eggs one at a time and vanilla extract
3.  Sift in flour and cocoa powder.  Fold in until just combined.
4.  Scoop into cupcake cases (I did this in two batches as I only have 1 mini cupcake pan) and   bake for 12 minutes or until a cake tester comes out clean/the sponge springs back to your touch.
5.  Leave to cool before decorating.


Mint Buttercream Frosting Recipe (makes enough to cover all of the cupcakes with the style of piping I used)

300g butter
450g icing sugar
2 tbsp milk
Peppermint extract, to taste.  I think in the end I used around 3/4 teaspoons, but do check as you go!

1.  Soften butter in mixer
2.  Add icing sugar
3.  Add milk and peppermint extract to taste.

Pipe, decorate, and then of course ENJOY!  ♧

Sunday 10 March 2013

♧ A Crafty St. Patrick's Day ♧

Happy March Break and pre-St. Patrick's Day everyone!!


I got a little crafty this week preparing for the new season of home decor and had a lot of fun making everything.

May I present, the second in my 'Pocket Sneaker' series - Lucky Pocket Sneakers (...I just made that name up, what do you all think!?)  Just in time for St. Patrick's Day, these shamrocks can be slipped somewhere special to wish somebody a little extra luck.  Maybe your little one has a test at school - send a little luck their way with a Lucky Pocket Sneaker in their lunchbox!! Or perhaps somebody is nervous to present a speech, or give a talk - how good would it feel if they found a little lucky charm in their pocket, or briefcase :-)


Similar to my Valentine's Day Heart Pocket Sneakers, they are felt, machine sewn and stuffed with polyester fill.  For the hearts I used a cookie cutter to make the shape, this time I used a foam shamrock I had bought for my other St. Patrick's Day project (...see below) and made it a little larger, just using the shamrock as a template and marking around it on the felt.  I used pinking shears to cut them out (just 6 this time as there was no game of hide and seek to play... not yet anyway!), sewed them together, stuffed and sewed shut.  And there you go, all done with lots of time for some St. Patrick's Day baking later this week.


My second crafty project for this season (and really, where would all of us crafty lovers be without holidays and seasons to make for?!) was some bunting to hang.  My 'Happy Birthday' banner I had made last year for Jonathan (see his 2012 birthday post here) had finally come down, only a month later so it was time to replace it!

I am super excited for how this turned out, and also how inexpensive it was to make!  A recent Walmart trip meant an excuse to pick up some green paint chips, pretending that our next wall would be coloured Emerald Green hehe... Last year I had seen this idea on Pinterest (where else of course!) and tried it for Spring bunting at Easter time (check it out here) so used the same scalloped punch to cut out all different shades.  A single hole punch cut out two holes at the top of each circle ready for the string.

Bunting displayed with original watercolours - painted by my
Granny who lives in Dublin, Ireland... how appropriate :-P
I decided against ribbon this time and thought I would try something different and got some Mason's twine, obviously because it was green and found some great foam shamrocks, both from the local Dollarama.  So, a total of $2.50 with countless metres of twine leftover - this was a very very cheap bunting project!!


For 10 feet of space I wanted to decorate, I used about 11 feet of twine, 28 circles of paint chip colours (so only around 15 paint chips, depending on the size of your punch of course) and 14 foam shamrocks.


Have a fantastic week getting crafty for St. Patrick's Day, especially if it's a week off work/school for you too.  I'm excited to get going on some crafty projects I've been saving up... oh and some tidying/sorting too... Less exciting.

Anyhow, enjoy!!  I'm looking forward to seeing all of your March projects too - leave me a comment and send me a link to your blog :-)