Monday 30 September 2013

Creating and Cake-ing for Choir ♫

Firstly, here's a big oops for only just writing this blog post!  It is Monday afternoon, which means this post definitely didn't go live on either Saturday or Sunday this weekend.  My bad!  Everything went a little crazy and busy and I'm finally getting a chance to write it before I dash out to teach this afternoon.

Today I'm going to tell you about a couple of musical things I have put together recently for my choir.  I'm a piano and music teacher primarily, but I sing with a really great chamber choir - the Cantabile Chamber Singers here in Toronto and we started back at rehearsals a few weeks ago.


I did a quick bake on a Tuesday morning so that we would have some sweet snacks for our first rehearsal break.  Why?... Because chats and catch ups are better over cake of course!  Anddd, well, with the morning off work I could think of nothing more fun than doing a spot of baking :)


I made some mini cupcakes and decorated them with some leftover cola buttercream from the Back to School cupcakes I made earlier in September - click here to see them and to find the recipe!  I used the same amounts as I did for the 12 regular sized cupcakes, and then following the same recipe it also made the 24 mini cupcakes.

To decorate I used this amazing design of rice paper cupcake toppers my little sister bought for me last year for my birthday!  I'm a weirdo and hate using up things, so I save them and save them until I can bear to be apart from them once they're all used up!  Funny story.. I only used 1 package of these, using a second pack of small blue ♫s for the rest (with a little water icing once the buttercream had run out!)... so GOOD NEWS I still have one pack left!

Thanks Livi and Simply Topps for these.  They were the perfect size for these mini cupcakes sat on a buttercream swirl (Wilton piping tip #12).  And the designs were fabulous, especially for this musical occasion.  Check out their website, they have some great cupcake toppers that make those quick baking projects nice and easy :)


Batter made and prepped, scooped out and ready to go in the oven!...


Slightly less time than in this recipe as they're smaller, 10 - 12 minutes will probably do it but do keep an eye on them.


I chose these black and white polka dots to go along with the colour scheme of the music notes toppers.  And here they are, piped and decorated, ready to be eaten at rehearsal :-)


And the second part of this post starts now!  Just a little crafty make I put together this weekend for our annual choir meeting which this year involved the usual business meeting and pot luck but also some super fun lawn bowling, and board games evening!  A lot of fun, and great to spend time with the choir away from rehearsal.

I made a bundt cake for the occasion, but well you'll have to wait another week or so for that post!  But you do get a little sneak preview of what it looks like when I show you the music cake bunting I made for it!  It was a kind of party and get-together after all so why not celebrate :-)


To make this cute little music bunting you need some really basic supplies you might even already have at home!  

Sadly I was on a time crunch and didn't get a chance to take photos as I created this bunting, but here's a run down of the steps and hopefully you can picture it!

To create the pennants I used black cardstock and a sheet of music scrapbook paper (thank you Michaels of course!)... They were 3cm across the top and 4 cm long.  I find it nice and easy to cut these out by marking the 3cm marks along the card, and then the 1.5cm points alternately which means using a paper cutter (or scissors) you can just angle the cutter from a 3cm mark to the opposite 1.5cm mark and then back creating the triangles as you cut!

As I had made a bundt cake I wanted the poles holding up the bunting to stand up quite a bit from the cake.  I used white lollipop sticks I already had from this project for my piano students!

But how to connect the flags to the poles!?  I was thinking about baker's twine, but the colours I had weren't matching enough for me... and then I had some music tape to fold over and attach that way, but I didn't like that either.
So, needle and thread to the rescue I used some black and white embroidery thread and threaded both pieces through a wide needle.  I tied one end to one stick and then threaded through each of the two top corners of the pennants, choosing to thread from the back and across the front so you could see the two-coloured thread against the card flags.  Finishing the 7 flags I tied it off at the other end, loose enough to have a little dip but not so much so it would drag on the cake!  


It really added just a little something to the cake, and everybody knew what contribution to the potluck mine was.  After all, I'm the strange one wanting to add decorations to a bundt cake just because! Hehe ♫

This little bunting was easy to put together, and you can chang up the flag designs SO easily with different patterns of scrapbook paper - and there are endless possibilities.  And, so long as the cake wasn't too messy or sticky inside these are reusable too!  Added bonus :)

I'll for sure be making many more of these now I have tried it so watch this space!  Have a great week everyone!

Sunday 22 September 2013

Fall into Autumn

It is officially the best season of the year!!!!  I'm so excited for Autumn right now.   The best part of nature happens, colours, Autumn foods and flavours, the best clothes to wear - layers, oh layers I missed you over Summer!

Last week I got into the spirit of the new season and made Maple Leaf Cookies by request for our choir rehearsal on Tuesday.  It was in fact to the day last year that I first made these cookies, so what better time to try them a second time.  They went down a treat last year - for choir, and for friends visiting Toronto from England so for sure I was happy to try this recipe again, thank you Martha Stewart for the original!

This year I got more adventurous and wanted to create a pile of leaves look to my cookies and thought that the maple glaze painted on the biscuits after they came out of the oven could do with some sprucing up - some red food colouring, and some brown so along with the plain coloured ones they created that amazing multi coloured leaf effect the maple leaves here in Canada create.


So on Tuesday I woke up bright and early and got to work on these cookies.  It had to be early to get done before work, giving it enough time to chill in the fridge, and then also freeze for a little while before putting them in the oven.  So I was on a mission, and I didn't stop moving until I had to leave.

Here's the recipes and some pictures along with it... I HIGHLY recommend this cookie, they are so delicious and well worth the bake!

I halved Martha's original recipe as I didn't need 8 dozen cookies that's for sure (although Jonathan may disagree!) and also had a minor freakout at 8am when I didn't even have 1 egg in the house!  I risked it and substituted it with nothing bad happening phew!

Ingredients (This made 36 cookies using my 2inch maple leaf cookie cutter)

1 1/2 cups all-purpose flour (plain)
1/4 teaspoon salt
4 oz unsalted butter
1/2 cup granulated sugar
1/2 cup light brown sugar
1/2 large egg yolk  (Here is where I had a mild panic.  No eggs so instead I just tried 1 tbsp milk and all was fine!... Maybe better than measuring out half a yolk anyway!)
1/4 cup pure maple syrup for the cookie batter
2 tbsp pure maple syrup for the glaze
Optional food colouring for the glaze (I used red and brown following the mixing instructions on the box)

Method

1.  Sift flour and salt into a bowl.


2.  Beat butter and both sugars with a mixer on medium-high speed until pale and creamy (around 3 minutes).

3.  Reduce speed to medium-low and then add yolk (or milk!), and maple syrup - beating well as you go.

4.  Add the flour mixture and beat until just incorporated.

5.  Shape into 2 disks, wrap each in plastic and refrigerate for at least 2 hours (or up to 2 days).


6.  Preheat oven to 325°F/ 160°C.

7.  Prepared baking sheets - coat them with cooking spray, line with parchment and then spray again.

8.  Roll out dough to 1/4 inch thickness onto a slightly floured surface.  Cut out with cookie cutter.  Place cut shapes onto prepared baking sheets, 1 inch apart, and place in the freezer for 15 minutes until they are firm.


9.  Bake cookies until the edges begin to turn golden brown - between 15- 18 minutes - but watch closely.

10.  Leave to cool for a couple of minutes and then transfer to a wire rack.


11.  After 5 minutes brush cookies with maple syrup and food colouring using a brush only used for food or cake decorating!


12.  Leave to dry, and then dig in!  Be prepared to be addicted!


I actually chose to only glaze 2/3 of the cookie batch.  The plain coloured cookies were un-glazed, not only to keep the original colour of the cookie, but just in case anybody (like me) didn't want their cookies too TOO sweet!  The maple syrup although delicious, does make for a chewy sweet flavour that I know not everyone wants :-)


Happy Autumn everybody!  

For more Fall inspired makes and bakes, check out my Pinterest 'Fall into Autumn' board, and also a NEW part to this blog... look below and add your email address to follow me :-)

Saturday 14 September 2013

A Taste of Britain: Toad in the Hole

One of my favourites being written up for the blog today!  Toad in the Hole!  Delicious sausages cooked in a fluffy batter, crunchy on the outside - soft and doughy on the inside.


Something that me and my brothers and sisters always used to eat courtesy of my Mum's cooking, and something that I don't eat nearly enough of any more.  The main reason for this is lack of good old English sausages here in Canada.  Now don't get me wrong, they have a lot of kinds of sausages here - Italian, herby, breakfast, maple, and all kinds of hot dogs but I have so far never found quite the right kind of sausage.

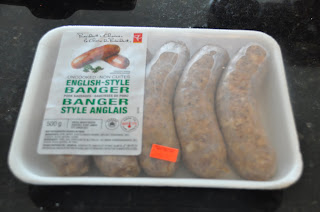
Earlier in the week we did a big shop and found these made by President's Choice... English Style Bangers!


Now I got VERY excited, threw two in the trolley (cart :-P) and carried on my way.  We were thinking of bangers and mash for Thursday's dinner, but instead - when I had a bonus couple of hours I wasn't expecting I got excited to make real dinner for a change and Toad in the Hole came to mind!

Before preparing it, of course I was skeptical about how 'real' these sausages would be... would they cook up the same as the ones I grew up with, would they have the same skin/coating to them... would they even taste the same?! ...

Dubious but Thursday morning rolled around and I prepared the batter for Toad in the Hole.

Ingredients:

4oz plain flour (all-purpose)
1 egg
250ml milk (I used 1% as that is what we have usually... you could use higher and proabably get a slightly nicer/richer flavour?)
Pinch of salt

2tbsp oil
Good old sausages!

I always remember knowing when it was Toad in the Hole night at home - coming home and already seeing the jug of batter on the kitchen counter, just waiting to be poured over sausages!  So this is what I do too, preparing the batter earlier in the day and then leaving in the fridge - until it is time to cook!

Method:

1.  Sift the weighed flour into a jug.


2.  In a separate jug beat the egg into the milk.


3.  Add the salt.
4.  Gradually add the wet mixture (milk, egg and salt) to the flour.  Use a whisk to incorporate air as you go.


After the first addition of milk to flour it will work into a big clump!  Keep gradually adding the milk, and keep whisking - it will eventually become a smooth, and hopefully lump free batter!


Store the batter in the fridge for at least 30 minutes or however much in advance you have prepared it (probably overnight is max.)

When you're ready to put dinner together...

6.  Preheat your oven to 220°C/ 430°F (hot I know!) and add oil (in hindsight, I actually didn't add enough oil to our dish - the sausages were quite lean and didn't make much of their own fat... this means there wasn't enough grease to help the batter to rise).
7.  When the oil is hot, add your sausages and cook (turning occasionally) for 10 - 15 minutes until browned on the outside.


8.  When the sausages are ready, open up the oven and quickly pour the batter over the sausages.


9.  Put back in the oven as quickly as you can and leave in the oven for around 45 minutes.

The batter should rise around the sausages, the edges will be browned but the inside batter still yellow and moist!


YUM!!!  I'm hungry again just writing about this.  I really do love this dinner, and can't believe it has been so long since we had it.  In fact I think it has been cooked only twice in this house!  One night when we had some friends over for dinner... and another time we cooked Yorkshire Puddings with beef for our Olympic Party.

A few more photos to get your taste buds going!...


Well it is done now (we finished the leftovers last night), and I can't wait to keep buying these sausages now I have ones that work (they were a great English herby flavour).  Even if they are not quite the same as the 'home' taste, they were really delicious.  My toad in the hole does need a little work - some more piping hot oil in the pan before adding the batter I think would make it rise slightly better and stop some parts of the batter sticking to the pan once it was cooked.  I could probably also bake this in a slightly smaller pan to make the space around the sausages smaller.  This would make the batter rise up and be less wide spread and crunchy.

But, all that being said - still very happy with this meal, and can't wait to make it again - sooner rather than later :)

Even if you're a little skeptical about the title of this dish... why would you want to eat something made of Toad!?  Or perhaps you know the other dish with the same title - an egg cooked in the middle round of toast?!  DO go ahead and try this - you probably have the ingredients for the batter already at home, and if you love sausages as much as I do then please try this out!  SO GOOD!


We ate ours with baked beans as we had a tin already open in the fridge... but serve it with a healthier option of peas... gravy for a full roast dinner feeling... or just on it's own with ketchup!

Enjoy :-)