Monday 28 October 2013

Pumpkin Palooza!

Happy Halloween week everybody!


I'll be honest, this is probably the closest thing to a Halloween post you'll be getting from me!  I'm not the biggest Halloween fan, and really the thing I'm most excited for this week on Halloween is that it is going to be a DAY OFF work!  My piano students aren't having lessons so I'll be baking my Christmas cakes all day instead :-D  I'm just switching holidays that's all :)

But on Friday we ran a Pumpkin Palooza night for the youth group ... we carved pumpkins, made them a Starbucks Pumpkin Spice Latte replica in the crockpot, ate pumpkin cookies, and played the most awesome pumpkin bowling game!  It was a really fun night, and I was excited to carve my PANDA PUMPKIN!!  


It makes me and my love for pandas happy this Halloween!  

So in addition to all the pumpkin adventures of Friday night I also got baking on Saturday inspired by leftover pumpkin puree.  I usually steer clear of pumpkin baking as it isn't something I have used a lot of before, and if I was choosing myself I'd go with a different flavour - probably lemon, let's be honest.  But the pumpkin puree was daring me to try using it so I thought a loaf cake would be perfect... Then my brain started whirring with ideas... What other flavour could I use?  How could I make this a fun bake?  What could I do to make it more pumpkin-y?  

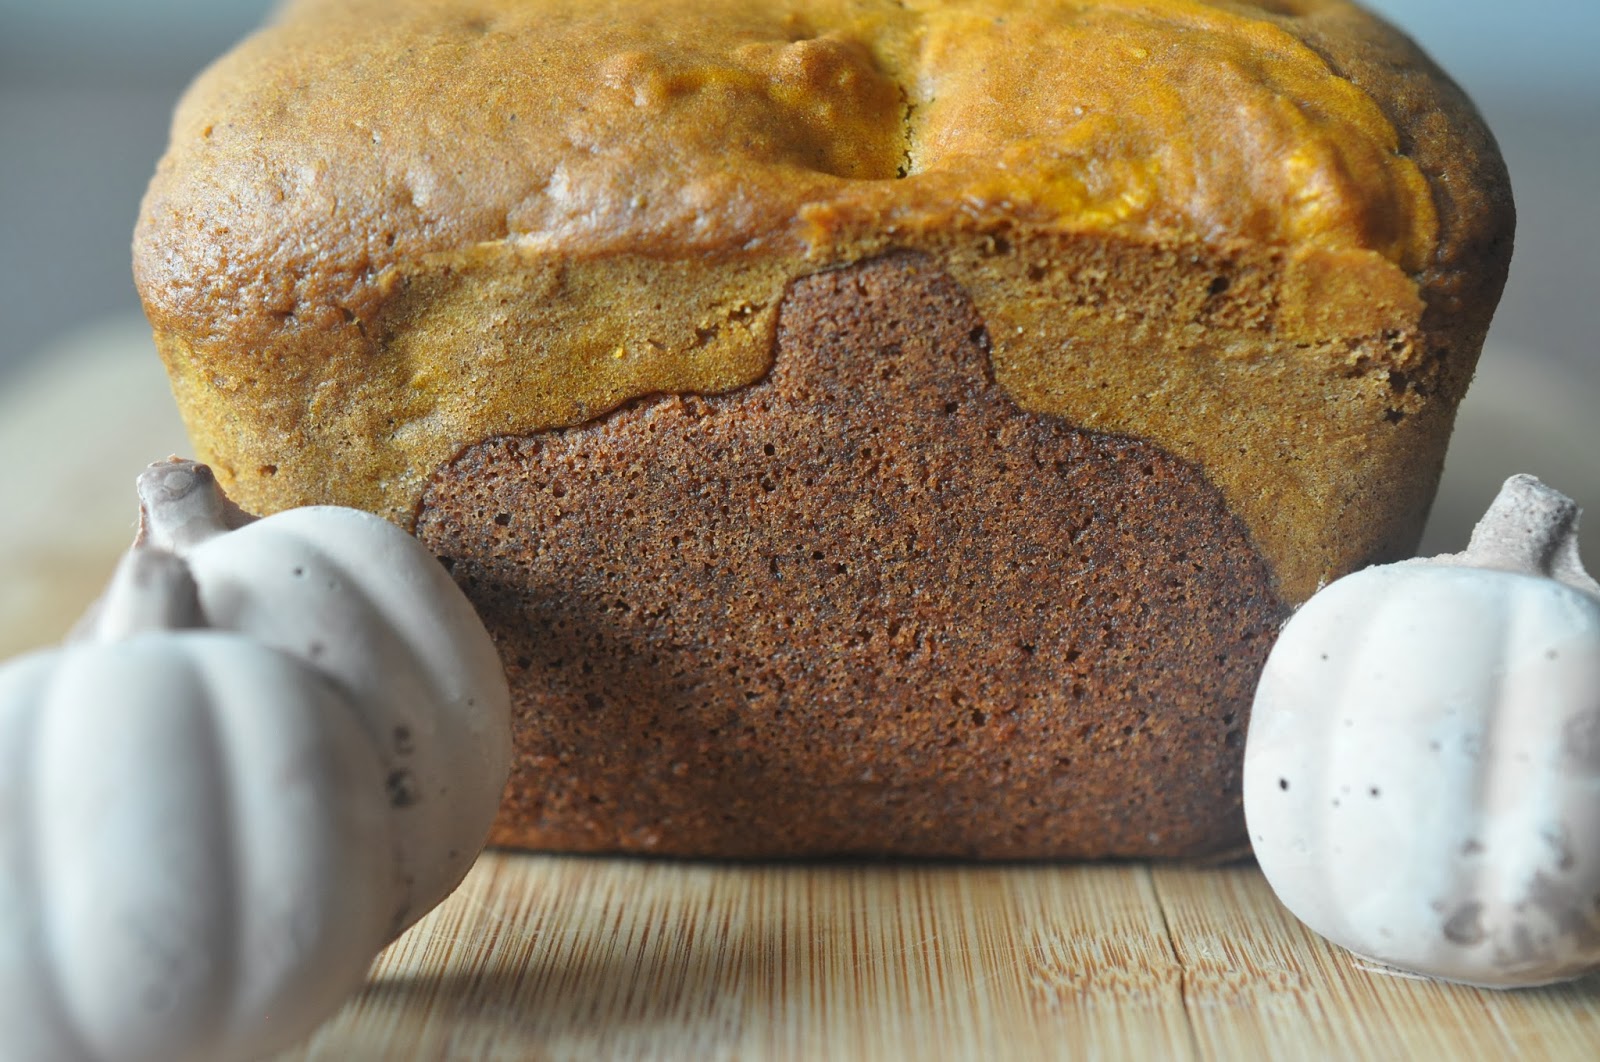
The result, my chocolate pumpkin in a pumpkin loaf!  


This is the first time I have tried the 'surprise cake' idea... but I've seen the polka dot ones a lot, and then also some really fancy ones like owls and panda bears.  A bit too tricky to try the first time, and I have already hit some bumps in this first trial run.  Next time I know what to do better and what worked so that's good anyway, even if it wasn't perfect this time!

It was a late night bake in a very messy kitchen so I'm afraid I don't have any pictures of the baking process but I will tell you what I did and how I did it and hopefully you can visualise what went on, or just ask if you have any questions about it :)

First things first, choose two flavours and or colours for the two parts of the loaf.  I chose chocolate cake for the pumpkin which would be the hidden surprise inside the cake (in hindsight this could have been darker and denser) and the pumpkin flavour which gave a great yellowy-brown colour.  

To find out the ingredients and method for the bakes check out the recipes at the bottom of the post.


I baked the chocolate cake first in my loaf pan, and left it slightly underbaked so it wouldn't get too dry in the second bake.  Using my pumpkin cookie cutter I bought on a whim from Michaels I cut pieces from the loaf cake.  I cut off the bottom part of the pumpkin as the cutter was a bit too big for the chocolate cake I had.  One mistake here was that the pumpkin chocolate pieces were not all exactly equal which did mean that the pattern right through the cake wasn't completely equal, oopsie.  Next time I'll make sure to use the whole cookie cutter to avoid this inaccuracy happening again!


Once the chocolate pumpkins were all laid out I arranged them a line through the loaf pan (boo I didn't quite have enough good sized ones to fill it, but 3/4 of the cake was filled!) and poured the pumpkin cake batter over the top making sure they were all covered.  I think the pumpkin batter was heavier than the chocolate cake batter, so next time perhaps I'll switch it around to stop the pumpkins getting squashed down by the pumpkin!

Back into the oven it went, and a while later I had my first surprise cake!  A pumpkin sitting in pumpkin :)  I'm pleased with most of it, and I definitely know more about this kind of baking for next time.  I can't wait to try some other designs.


I tried adding some more pumpkins to the equation with some chocolate pumpkins using a silicone pumpkin mold.  I think I hadn't left it to dry for long enough after pre-washing it as some of the chocolate had a funny coating on it - still edible but they look like those fancy white pumpkins instead of the brown ones I was going for ... oh well!


So before we ate this I cut into the cake to check out what it looked like on the inside.  Kind of cool but maybe needed more colour contrast?


The chocolate cake was yummy and the pumpkin cake was so moist and delicious (I'm not even a huge pumpkin fan!) but I did like this! 

So, however you're celebrating this week - whether it's lots of costumes and parties with the kids, or a night at home giving out candy, or maybe if you're like me - enjoying some time off away from Halloween thinking and planning for the next (and best!) holiday of CHRISTMAS, have a good one :)

Recipe time now!  Firstly, for the chocolate cake (adapted now so that it will be enough to fill the loaf pan and get better cut outs)...

Ingredients:

5oz self-raising flour
1oz cocoa powder
6oz sugar
6oz unsalted butter
3 eggs

Method:

1.  Pre-heat the oven to 375°F/ 190°C and grease and line a loaf pan with parchment paper.
2.  Cream together the butter and sugar in a mixing bowl.
3.  When the mixture is light and fluffy, beat in the eggs one at a time, scraping down the bowl as you go.
4.  Sieve in the flour and mix together.
5.  Bake in the oven for 20-25 minutes until the cake is no longer liquidy and a cake tester comes out almost clean!
6.  Turn the cake out onto a cooling rack, and once it is cooled down slice cake and cut out each slice with a cookie cutter.
7.  Stand up each piece of cake, line up through the loaf pan and pour pumpkin batter over the top.

... For the pumpkin cake (which can be made while the chocolate cake is baking, or cooling!).  Recipe adapted from this recipe - thanks Summerhill Market (coincidentally in Toronto!!).

Ingredients:

1.5 cups all purpose flour
2/3 cups sugar
1 tsp baking soda
1 tsp baking powder
1 tsp ground allspice
1/4 tsp salt
2 large eggs
1 cup canned pumpkin puree (not the pumpkin pie filling)
1/3 cup vegetable oil

Method:

1.  Pre-heat the oven to 350­°F/ 175°C (and re-grease and re-line your loaf pan with parchment paper placing the chocolate pumpkin cake cut outs along the bottom middle of the pan.)
2.  Mix together the pumpkin puree, eggs and oil.
3.  Add the sugar to the mixture.
4.  Sieve the flour, baking powder, soda and salt into the pumpkin and sugar mixture.  Beat until all incorporated.
5.  Pour the batter over the chocolate cake pumpkins and around the edges making sure that the chocolate pumpkins are covered.
6.  Bake in the oven for around 50 minutes or until a cake tested comes out clean.  Let it cool in the pan and then turn out onto a wire rack.

Thanks for reading!  

* Happy Halloween and Happy Baking! *

Sunday 20 October 2013

Getting ready for Movember 2013!

2 WEEKS TO GO EVERYONE!


2 weeks until the little spikes of hair start to peek through.

2 weeks until a dark shadow starts to appear on our friends', husbands', brothers' upper lip.

2 weeks until men start to compare how much facial hair they can grow.

2 weeks until the funny wax, the mini combs and the darker hair dye comes out to play.

2 weeks until MOVEMBER everybody!


This is one of my favourite times of the year... When everything MO comes to life!  Mo cookies, mo cakes, mo t-shirts, mo accessories and oh yeah - the real thing as well, all those men walking along the street with their little moustaches.  I love seeing and knowing those people participating in Movember!

And why wouldn't you?  It is SUCH a worthwhile cause and has become really popular in recent years!  This year will be the 3rd year my husband has grown a moustache for Movember and the 2nd year I have officially been a Mo-Sista also collecting donations and doing my bit to support him in his growing!

Movember is a moustache growing charity held annually each November to raise awareness and funds for many aspects of men's health, in particular about prostate cancer.

Last year I started my Etsy store selling Moustaches for Movember... I wanted to be able to wear a moustache as well as just watching my husband's grow :)  And so, my hair clip and jacket pin moustaches were born!  Here's the mini post I wrote about last year's collection of MOs!

This year I have got to work again, making new moustaches in a variety of new and exciting colours.  On Thursday I sat down FINALLY to do some sewing.  I haven't used my sewing machine all Summer and I could hear it crying for me.... I have missed it but I'm really glad I got it out and got sewing this week - all is well now!

This isn't a tutorial as such, but rather just a run down on my sewing day earlier this week - making a couple of moustaches for an Etsy order ... anddd a couple just for me and Jonathan :-)

All my supplies out, and ready to start moustaching!


Two different grey colours for my order, and a special teal just for me :)  It is my favourite after all, and I thought it would look great against my grey jacket I've been wearing a lot so far this Autumn.


Templates from last year in small, medium and large all ready to go!  This week I made 2 medium for the order, and 2 small for us.  I definitely have to make these more sturdy if I am going to keep using them!  Right now they're just paper, but I'm thinking of transferring them to something thicker soon.


Marked out with tailor's chalk and ready to be cut out...


All done and ready to be sewn up :)


Now to find some coordinating thread... I just about had the perfect ones.  It did mean for a lot of changing over of the spools on the machine... but oh well, it was only 4!


4 moustaches sewn up, stuffed with Poly-Fil and here they are ~ cute little chubby moustaches ready for their clips to be attached.


The smaller ones are definitely harder than the medium and large - just a bit more fiddly, and harder to stuff than the bigger ones... but I do like the way they look!


A bit of posing for my 4 moustaches while they were waiting for the glue gun to heat up!


All finished :)  1 hair clip barrette... and 3 bar pins to attach to a jacket, on your purse, your backpack... to wear as a bow tie, or maybe even a tie clip!?


So there I was a little while later, 4 moustaches richer!  2 to send out to my first Etsy customer of the Movember season (yey!) and the others for our house!  I chose a Toronto Maple Leafs blue for Jonathan and my favourite teal colour for me, but perhaps depending on the outfit I'll be borrowing his as well :-P

Here are the other colours on offer this year!  Lots to choose from ...


And with this new set of moustaches in all new colours I thought a new business card was needed too.

A few weeks ago I worked REALLY hard on the new blog header (look up!), and also my Facebook cover photo and Etsy profile picture so I thought it was time to put some of these to use on paper as well!  So I worked EVEN HARDER in Picmonkey and designed a few social media icons first (wow you graphic designers do fiddly work!) and then put it all together into a business card... 


For now they are just printed at home on cardstock, and the back side of it printed a little off colour so I definitely need to get these printed in better quality BUT for now, they'll do!  I'm pretty pleased with how they look :)  What do you all think?!  Did I miss anything?  Design feedback very welcome!

And so, with my thank you tag attached these MOs are ready to be delivered, in time to be worn right from November 1st.


In addition to being a really fun little project for my Etsy store (which yes, isn't that big!) I'm also donating $2 per MO to Movember for every moustache sold from now until October 31st!

Here's to a really successful Movember 2013 and please do go check out my Etsy store to see my listings =D

And remember, whether it's a real hairy one, or a hair/jacket clip...

* Wear your moustache with pride this Movember *


Monday 14 October 2013

Preserved Peaches one day, Peach Bundt Cake the next!

Happy Thanksgiving everyone!  To all the Canadians celebrating today, I hope you have a fun filled day with lots of turkey, family and friends.

We had an amazing weekend away, I was spoilt by my husband to a surprise weekend in the beautiful Haliburton, Ontario surrounded by amazing Fall colours, wild turkey, deer and lots of lakes!  And then yesterday we got to spend the day with Jonathan's family and cousins at their cottage with a delicious Thanksgiving dinner.  What a great weekend :)

So now, it's a bonus day off work and it's catch up day!

... Starting with... my Peaches and Cream Cake that I promised you a couple of weeks ago.  I made this peach bundt cake for our annual choir day out and meeting which of course took place along with a pot luck!  You already saw the DIY cute and easy cake bunting I made to music it up but the cake hasn't been blogged yet.  So today here it is!  


We were so lucky to be given a delicious jar of preserved peaches from Jonathan's grandmother a few weeks ago, so when I was thinking of something to make for the choir (thinking about what would feed everyone, but also be kind of new and fun to try) these jumped into my brain.  Peaches!  I've never baked with peaches before so this was perfect... off to the internet to find a recipe.


I found this great Week of Menus recipe that I slightly altered, but it served a perfect starting point for this bundt cake :)  

For the cake...

Ingredients:

3 cups all-purpose flour
1/2 teaspoon baking powder
1/2 teaspoon baking soda
1/2 teaspoon salt
1 cup unsalted butter
1 3/4 cups granulated sugar
4 large eggs
1 vanilla pod, split (the original recipe called for 1 pod, but I actually only had 1/2 of one!  The flavour still came through just fine luckily!)
1 cup sour cream
1 cup diced peaches (as you know, I used preserved peaches, but you can go with fresh if they're in season!)

Method:

1.  Preheat oven to 350°F/ 180°C and grease and lightly flour the inside of a 10 inch bundt pan.


2.  Whisk together the flour, baking powder, baking soda and salt in a large bowl and set aside for later.


3.  Using a mixer, beat the butter until creamy (around 2 minutes) and gradually add the sugar and beat at medium-high speed until the mixture is light and fluffy.


4.  Beat in the eggs, one at a time.  Beat mixture after each addition.  Scrape the sides of the bowl down as necessary.  


5.  Scrape out the vanilla seeds from the pod and beat into the egg mixture. Keep the empty vanilla pod - don't throw it out yet, you'll need it for the syrup!

6.  At a low speed, add the flour mixture in three additions, alternating with the sour cream but beginning and ending with the flour.


7.  Scoop half of the batter into the bundt pan and spread with a spatula.

8.  Add diced peaches to the first half of the batter.  I chose to keep the peaches in the centre, so that the batter would completely surround the peaches keeping them right in the middle of the cake, with none escaping out of the sides!


9.  Scoop the remaining half of the batter on top of the peaches.  Spread with a spatula to smooth down the top surface.


10.  Bake in the centre of the oven for 50 - 60 minutes (mine actually took 65 minutes to be precise!  Keep an eye on it and test with a cake tester/skewer to check it is cooked through).  Cool the cake in the bundt pan on a cooling rack for 10 minutes then flip out onto another cooling rack placed on top of a baking sheet or tray to continue cooling.  


And for the syrup - make while the cake is baking...

Ingredients:

1/3 cup fresh peach puree
2/3 cup granulated sugar
1 tablespoon peach syrup from the jar of preserved peaches OR 1 tablespoon orange juice
1 empty vanilla pod (kept from earlier in the cake baking!)


Method:

1.  Take 4 slices of peach (leftover from the jar of preserved peaches), and puree it until smooth.  Depending on your size of slices it may or may not make exactly 1/3 cup of puree but that's what you're aiming for - try it until you get that much puree!


2.  Combine peach puree, sugar, empty vanilla pod and syrup (or juice) in a small saucepan and cook over medium heat, stirring until the sugar dissolves - around 3 or 4 minutes.


3.  Remove the pan from teh heat, and using a pastry brush, dab the syrup generously all over the surface of the warm cake, allowing it to soak into the cake before giving it another coat.  Then let the cake cool completely.


Then when you're done making and baking, it's photo time of course!

For this cake, as it was for a choir event I was excited to try making some cake bunting... Hehe BUNTING for the BUNDT cake (joke credit to my husband as he proof reads this!)...

I thought this would be the perfect cake for some bunting... with the poles on either side of the cake, music flags strung out over the hole of the cake.  If you missed the tutorial on this, click here!  It was really quick and easy to make, and I thought it was a really cute little way to glam up the cake :)


And of course, a little notecard to tell everybody what the cake was!  I like to know what I'm about to eat, especially if, on first glance you can't exactly see what would be inside, or what the flavours are.


I chose to call this a 'Peaches and Cream' cake... I know traditionally, peaches and cream would be sliced peaches and whipped cream - but the peaches are there for sure, and the addition of the vanilla pod gives it the vanilla cream flavour :)

It tasted really delicious, the preserved peaches were even better than fresh peaches in my opinion - because they have been soaking in a delicious peach sugar syrup for a while before even going into this cake!  The cake was moist, and had such a thick peach glaze on the outside which gave it a sugary crunch before the mouthful of cake!


Fresh peaches, peach syrup, along with vanilla cake = yum!  

Any more jars of preserved peaches out there, I'd be happy to receive them!!!