We performed at a beautiful church in Toronto, and you can even see a snippet of our performance. If you love 'Silent Night' click here and go to our Facebook page to see a video of the show :) It was one of my favourites, so I'm very happy to be able to share it with you!
For this concert, our conductor and Artistic Director (and good friend of mine) asked if I might be able to make the choir some accessories. In the past we had often coordinated colours, and always worn black concert clothes, but didn't have an official choir uniform that we had each concert. So going with one of our favourites, a red colour scheme I got to work and set to making 18 choir accessories we could wear not only for this holiday season, but for every concert!
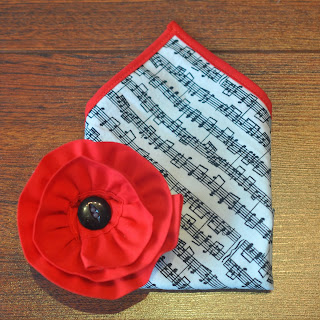
I chose to make pocket squares for the gentlemen, and flower pin brooches for the ladies.
Using music notation fabric I bought in JoAnns earlier this year I knew this would make a great bold black and white visual of music for the men.
In my first trial of the pocket squares I edged the fabric with ribbon after hemming the edges of the square. However, on thinking about it, and finding the perfect double fold red binding tape I actually edged the squares with this instead, creating a really nice contrasting red colour which would pop out of the pocket once folded. I love the colour choice my conductor wanted to go with and, there's no going wrong with red, black and white I think!
So, 9 pocket squares later, some ironing and folding done I was ready to tackle the flowers.After ALWAYS seeing flowers online, how to create ruffled flowers, folded ribbon flowers, gathered fabric flowers, all kinds of easy DIY brooches or hair accessory flowers - I had actually never made one myself. I've been too focused on the boys onesie bow ties and moustache pins/clips!
So, after a lot of research on some "how to's", some good old fashioned reading in sewing books etc I came up with a mix of methods which I felt I would be able to pull off (during an extremely busy week!)
I don't have many tutorial-esque photos I'm afraid as I was in a bit of a time crunch the whole time... but I'll try and describe what I did as I went along!
I started with a round of black felt that would be the base for the flower. The bigger the circle, the more fabric you'd need, and the bigger flower you'll end up with. I started trying a circle of this end of the whisk attachment but it ended up being too big.
Instead I ended up going with a very professional 2inch round fish food tub to measure the circles!
I had found this great ruffled trim in the perfect red for the flowers, cut initially into 12inch strips (although on making it I found 10-11inches to be long enough) and with my glue gun and button ready to go it was flower time!
Starting around the edge of the felt circle I applied the glue, and circled the fabric trim around the edge, winding my way in and applying glue as I went. Circling inwards to the centre of the flower eventually coming to a point in the centre.
I glued a black button to the centre (kind of looks like a poppy I think too?).. and then attached a pin to the top middle of the back of the flower.
Using a 2inch felt circle, with 10-11inches of fabric trim wound to the centre gave me a 3-4 inch diameter to the flower. Perfect for attaching to our black shirts, jackets or dresses - and still big enough to be visible to the audience.

With enough pocket squares and flowers made, ready for our Saturday evening concert I posted it on my Facebook page and also on Instagram so everyone got a little sneak peek of what they'd be wearing, or seeing at the concert. Are you following me yet?! Click the links to always be first to know what I've been making or baking :)
I got some nice feedback about the choir accessories at the concert, and everyone looked really good wearing them - can't wait for our next concert in March to see everyone in them again!
Happy pre-Christmas everyone, hope you're enjoying some fun times, delicious foods and of course some festive music and songs ♫


love the flowers!! AND I've featured this on my weekend sewing features. thanks for linking up to create link inspire party! Awesomeness!! I'm also going to give a shout out on all my social media.. hope you are able to do the same... Happy Weekend! Emily
ReplyDeletehttp://www.nap-timecreations.com/2013/12/top-five-christmas-sewing-tutorials.ht
These are lovely. Your concert was beautifully done. The acoustics in that church were really good. Thank you for sharing it at What We Accomplished Wednesdays. Have a very merry Christmas!
ReplyDeleteI will be featuring your post on Tuesday 31st December in a tutorial roundup.
ReplyDeleteThank you so much for sharing this on Tutorial Thursdays Linky Party. I look forward to seeing you again this month :)
x
Natalie
Marigolds' Loft