Sunday, 25 August 2013

Birthday Blueberries!

Just a quick one today, a pre-scheduled post seeing as today I'm super excited to be checking out the Elephant's Trunk Flea Market right now! :-)

Hope you all enjoyed my husband's guest post last week - wasn't it good!? Hehe, I loved the cake and was sad to eat the final slice, but I am still posting a little about my birthday...dragging on the great day a little longer!

We enjoyed a fantastic day hiking, at the farm and then blueberry picking!  This was so fun, I'd never done it before and it was even better than I thought.  A perfect time of day for it, and a beautiful farm to do it on!

Earlier this week I made some blueberry muffins - possibly the healthiest recipe I've ever made, especially as I can still call it cake!  They were really yummy, and gave us a delicious snack for our road trip and there are still almost 1.5 litres of blueberries left in the freezer for more blueberry makes and bakes when we get back.


Here's the recipe I used, and how they looked (apologies for only having one instagram photo, it was a rather rushed day packing and teaching piano the day before our trip!)... I do however have some phone photos from our time picking the blueberries, check them out below :-)

Ingredients (Makes 12):

225g plain flour
1 tsp baking soda
1/4 tsp salt
1 tsp allspice
115g sugar
3 large egg whites
3 tbsp low fat margerine
150ml plain yogurt (I used 2% greek yoghurt as it is what I had in the fridge!)
1 tsp vanilla extract
3/4 cup fresh blueberries

Method:

1.  Line a 12-hole muffin tray with cupcake cases and pre-heat oven to 375°F/190°C.
2.  Sift the flour, baking soda, salt and half of the allspice into a large mixing bowl.  Add 6 tablespoons of the sugar and mix together.
3.  In a separate bowl, whisk the egg whites together.  Add the margarine, yogurt, and vanilla extract and mix together well, then stir in the fresh blueberries until thoroughly mixed.  Add the fruit mixture to the flour mixture, then gently stir together until just combined.  Do not overstir the batter.
4.  Divide the muffin batter evenly among the 12 cups in the muffin tray.  Mix the remaining sugar with the rest of the allspice and sprinkle over the muffins.
5.  Transfer to a pre-heated oven and bake for 25 minutes, or until risen and golden.  Remove the muffins from the oven and serve warm, or place them on a cooling rack and let cool.

Fresh blueberries - nicer than any other blueberries I've ever tasted!


We filled a 2 litre basket each!  We have given some handfuls away, eaten some on their own, baked some into the muffins but also frozen some for another time.


The amazing fields and fields of blueberries!  And the great wagon who took us on a little tour around to our blueberry patch! 


Fresh blueberries and blueberry frozen yogurt (pre-dinner dessert!!) - yum!!


So far a delicious (and a little healthy?!) treat baked with these amazing fresh blueberries... Maybe there will be some more birthday blueberry posts coming soon!  Hope you're enjoying these final weeks of Summer before back to school begins, we're definitely trying to make the most of it!

Sunday, 18 August 2013

Happy Birthday to Me ~ from my Husband!

Today is the day you see the first ever guest post featured on Sew Lah Tea Dough!  I stayed close to home for the first one, and well, I'm a little biased after all.  Today you get to meet my amazing husband and see the incredible and delicious birthday cake he made for me :-)  I'm the baker in the house, but since we were married I've been lucky enough to have a birthday cake surprise each year!  This year was particularly yummy, and inventive.  I came home from work, not being able to look in the kitchen but smelling some tasty flavours in the air, before being let in on the secret on my birthday-eve.  He even said he had been taking photos as he went along - just like I do when I'm making or baking something I know I will blog about... sooo yes, after all that hard work - he definitely gets to write the blog post for me this week and I'll be back next week!  Ciao for now, and may I introduce the baking version of my husband Jonathan ♥


Hello.  I am Jonathan.  I am usually not a baker - at all!  I love to get in the kitchen and cook, but usually that is freestyling, and I'm pretty sure freestyling a cake would basically result in either a puddle of goo or a large hockey puck.  But for Hannah's birthday, I thought it wouldn't really be fair to make her bake her own cake, so I tried to find a recipe and whip something up.

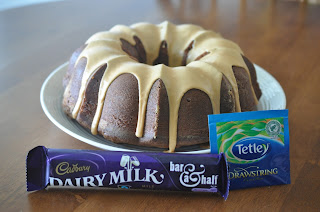
I know Hannah likes chocolate, so I wanted to make a chocolate cake.  Not only that, I wanted to make a cake that has actual real chocolate in the mixture.  You'd think the internet would be full of recipes like this, but if you thought that (like I did), you would be wrong.  Almost all the chocolate cake recipes I found use cocoa powder to chocolatify their batter, so I had to keep searching.  I knew I wanted to use Dairy Milk bars, because Hannah likes it, and because we had a bunch of it left over sitting in a baggie on the counter.  Even the Cadbury website didn't have a recipe I could use.  Finally I found one - on the Hershey chocolate website and decided to use it, but substitute one brand for the other!

Ingredients (Serves 12-16):

1 cup butter or margarine, softened
1 1/4 cups granulated sugar
4 eggs
6 (1.55 oz each) Hershey's Milk Chocolate, melted (I used Dairy Milk here instead)
2 1/2 cups all-purpose flour
1/4 teaspoon baking soda
Dash salt
1 cup buttermilk or sour milk (I did the add-a-teaspoon-of-vinegar trick because I forgot to buy buttermilk)
1/2 cup Hershey's Syrup (I used Nesquik, because that's what we had)
2 teaspoons vanilla extract

Directions:

1. Heat oven to 350°F.  Grease and flour 10-inch tube pan or 12-cup fluted tube pan. (Make sure you get every inch of the pan greased and floured.  Missing a spot is bad, as we will see later.)
2. Beat butter in large bowl until creamy.  Gradually add granulated sugar, beating on medium speed of mixer until well blended.  Add eggs, one at a time, beating well after each addition.  Add melted chocolate; beat until blended.
3. Stir together flour, baking soda, and salt.  Add to chocolate mixture alternately with buttermilk, beating until blended.  Add syrup and vanilla, beat until blended.  Pour batter into prepared pan.
4. Bake 1 hour and 15 minutes (mine was in for an hour and a half, when I thought it was done, but in the end it was still maybe just under being well done), or until wooden pick inserted in the centre of cake comes out clean.  Cool 10 minutes, remove from pan to wire rack.  Cool completely.  Sift powdered sugar over top (OR make a glaze, like I did!)


So yes.  That is what I did, with the few changes I made annotated in the recipe.  As I mentioned at the end, I wanted to make some kind of glaze/icing for the cake.  It was already a Bundt cake - not a traditional birthday cake - and I wanted to make it a bit more celebratory.  One of Hannah's favourite things to do with chocolate is to dip it in her tea.  Her best thing is getting a large chocolate Easter egg, breaking it into pieces, an using them to scoop up the tea, letting it melt a bit, and then drinking it.  So what better icing for her chocolate flavoured cake than a tea flavoured glaze!

Again, it was off to google I went.  After looking through a number of different recipes, I ended up finding one for Chocolate Chip Shortbread with Earl Grey Tea Glaze at Good Cooks.  I used this as my jumping off point, but I wanted to make it a 'normal' tea glaze, using Tetley tea bags.  Here is the recipe.

Ingredients:

1/4 cup boiling water
3 bags of tea
1 cup powdered sugar
1 tablespoon butter, softened

Directions:

1. Pour boiling water over tea bags, allow to steep 3-5 minutes.  Remove tea bags.


2. In a small bowl, stir together powdered sugar and butter.  Gradually stir in enough tea to make glaze thin enough to drizzle. (DON'T MAKE IT THIN!  I guess this is meant for drizzling over cupcakes, but in this case I wanted it to be poured over and to ooze down the sides of the cake.  I was actually afraid I was leaving it too thick, but it did dribble down nicely.  But you want it quite thick - kind of like molasses.)


And that's all she wrote... or in my case, 'he wrote'.   Baked the cake, had the heart-stopping experience of trying to turn it out of the pan, had a little bit stick to the pan (grease and flour properly please!), and had a nice gooey glaze drip down the sides.  I think the cake is delicious - I think Hannah does too - and we shared a bit with my two grandmothers who both said it was moist and good.  They kind of didn't believe I had baked it :(  But here's the proof, real life photos!  ... Happy Birthday Hannah!


Right - gotta go - time to eat some cake!

~ ~ ~ So there it is!  My first featured guest on the blog... something I'd like to start doing more in this coming year (...yeh, I run on school years still).  Hope you liked it!  It really was a good cake, and he's done a good job right?!  #BestHusband ♥

Monday, 12 August 2013

A Campsite Cook Out!


A few weeks ago now Jonathan and I took our first ever trip to the amazing Algonquin Park!  It was SUCH a fun trip, different to our whirlwind East Coast trip last year (arriving at a different campsite each night after dark!)... So great to set up our things and know we were staying there for the whole 4 days!!  We did a bunch of fantastic hikes, seeing the landscape and amazing ecology of Algonquin.  Super fun was our canoe rental for 24 hours, taking a long paddle out, as well as an evening trip and also a REALLY early morning one!  (That's right, 6.15am paddle kind of early!)

Sadly we didn't see much wildlife - nothing big - I was really hoping for bears and moose, but the 40°C heat might have had something to do with that!  An amazing trip however, and we can't wait to go back (...at a time with less bugs that's for sure!).

Something we don't do enough in our lives is plan our meals, but packing up the car for a 4 day trip meant we had to!   We planned everything out, and got it all ready... However it did mean we ate a lot, almost everything we took hehe!  We do love food after all :-D

Here's a little blog post to show some of our meals and how we cooked with our new Coleman stove (yey!).

DAY 1:  Dinner ~ Hot Dogs and Caesar Salad


Nice and simple right?!  We arrived at our site about 3pm and got set up, went on a few short hikes - exploring Beaver Pond, Spruce Bog and Lookout before cooking dinner.  Nothing fancy tonight - cheese hot dogs cooked on the grill side of the stove, buns, ketchup and a bag of caesar salad.  Definitely the easiest way to eat salad while camping!  Just shake the mix and croutons all in the bag - no bowl needed which reduced our washing up to do!


DAY 2:  Breakfast ~  Bacon and Eggs on Toast


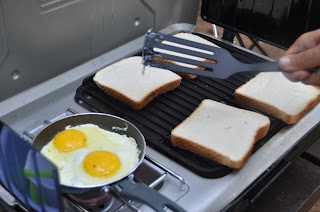
A nice hearty breakfast of grilled bacon, fried eggs (sunny side up to start off the heatwave of a day!) and toast along with kid's juice boxes!  To cook the bacon we made sure to put foil underneath the grill part if the stove - this definitely helped with clean up!  Eggs were done in a small non-stick frying pan (thank you IKEA for this $5 purchase - it was perfect!) - 2 eggs fit nicely together in the pan but the toast was more troublesome.  There were slightly warmer parts of the grill than others, so some rotation was needed but although it looks a little black in parts - the toast itself was delicious and didn't actually taste burnt!  And believe me, I hate burnt toast!


Lunch ~ Sandwiches on the hike!

No pictures of our lunches I'm afraid - but they were the same each day!  Delicious challah buns filled with ham and cheese, or chicken and cheese - with some chips, granola bar and a mint kit kat!  Just a few snacks to keep us going on our Mizzy Lake hike!  The amazing forest didn't keep the heat away and we really needed lunch by the time we found a good place to sit (away from black flies!)... However we definitely should have taken more water that day :-S!

Dinner ~ Chicken and Pasta Alfredo with Garlic Bread

Quite honestly we ate better (not healthier) on this trip that in our normal lives!  Definitely not healthier, but I figure we were walking and canoeing - that balances out the s'mores and snacks right?!  But our meals were much better planned out and it was just so much fun cooking outdoors and getting everything ready al fresco!


This evening's dinner was well deserved (in our opinion!), and the pasta was the perfect thing after our day's hiking.  We boiled water on the burner side of the stove, added the shells and cooked until softer than al dente!  Then we did some jiggling around with a too small sieve and a bowl which had the pasta sauce in but Hannah to the rescue and it all worked out!  We had already pre-cooked 2 cubed chicken breasts on Sunday night before we left, and kept it in a ziploc in the cooler until the pasta, sauce and chicken were ready to be combined to heat it all through.  Meanwhile a frozen garlic bread wrapped in foil was placed on the grate of the fire pit which was burning away nicely.  It was perfect!  Around 20 minutes on the grate with a fire underneath was all it needed - pretty happy with that!

It was DELICIOUS!  The mushroom alfredo sauce was nice and creamy, and it was a good mixture of store-bought, pre-cooked and cook out camping style!

DAY 3:  Breakfast: Sausage Waffle Sandwich


Super yummy and kind of fun!!  A different twist on breakfast today!  Pulled out of our freezer was 4 leftover waffles, and a pack of brown sugar and maple syrup breakfast sausages we had stored in there from a while ago.  Nice and easy - two things we already had and didn't need to shop for.

The waffles had thawed slightly, but toasted up just fine on the grill, and the sausages we cooked in the pan, and also cooked and saved some to have cold in a sandwich!!  YUM!

The sweet breakfast flavoured sausages paired so well with the waffles slightly buttered, we'll definitely make this again :-)


Lunch ~ Packed lunch again!

Today was our canoeing day, we enjoyed our picnic lunch on an amazing little section of beach just for us!

Dinner ~ Leftovers!  

We had originally planned corned beef and jacket potatoes (cooked in the fire) for this evening, but we had a couple of hot dogs leftover and another caesar salad bag so we just did that!  This meant we left lots of room for a lot of s'mores!  Roasted marshmallows with chocolate digestives YES!


A terrible photo I apologise!  I just wanted to get them eaten :-D

DAY 4:  Breakfast ~ Pancakes and Maple Syrup

Our final cooked meal of the trip :-(  Pretty sad to leave our little campsite home!  We picked a great spot, pretty private from other campers, nice and quiet and very close to the beach!  Just steps away which was perfect.  We'll definitely book that spot at Pog Lake again :-)


Our final decadent breakfast was pancakes and maple syrup.  Using our wee little frying pan on the burner we made delicious fluffy pancakes (thanks to the powdered mix from Loblaws!).  I am not a cake mix kind of person, but this time - for camping we thought we would try out a pancake mix, and for this it worked perfectly and I'd definitely use it again - they were delicious!


The box came with way more powdered mix than we actually needed on the trip, so in a tupperware box we measured enough to make 8 pancakes (hehe)... there was a lot of extra room in the tupperware but we wanted to use the box as a mixing bowl when we added the water!  2 birds with 1 stone here - storage for the mix and a mixing bowl on the day we prepared them :-)


Yummy fluffy American pancakes with some maple syrup (that had definitely leaked out of it's container, but luckily not the extra ziploc...I had a feeling it might happen!) was such a great way to end our campsite cook out!


Another reason this was our final day's breakfast was as this meal required no cooler to keep anything cold.

Lunch ~ More sandwiches then home!

We did another couple of walks after packing up our campsite and even caught a tiny far-away glimpse of a moose before heading home.

So there you go, our 4 day getaway to the incredible Algonquin Park - what we ate and how we prepared it.  Nothing too fancy or too crazy, but delicious nonetheless, and definitely simple to prepare and cook :-)

Hope you're all having a great Summer, thanks for reading today!!

Tuesday, 6 August 2013

Happy Birthday little sis!!


I'm back!  Yesterday I returned from a fantastic week spent in England with my family and friends who I miss SO MUCH!  We had a great time catching up, shopping for everything I can't get here in Canada, having lunches, visits and multiple cups of tea :-)

I was super excited that my trip (which was rather spontaneous and last minute!) coincided with my little sister's 20th birthday and she was planning on being home from her university house to have a family gathering with some yummy food!

One of the things I miss most about England is when the whole family gets together and I don't get to be there celebrating with them... as well as doing so much baking that I never get to share with them.  I did actually take a slice of last week's nautical themed earl grey tea cake with orange buttercream you can see here for my Mum to try!

So being there for my sister's birthday meant I could be involved with her birthday cake!  I had an idea a while back that I would take zebra fondant cupcake toppers with me and bake the cupcakes the day before... but on talking with my Mum before I got there she said she didn't have a real idea for a cake yet and it might end up being something plain, so we combined our ideas and my fondant cupcake toppers became the cake decoration, yey!

We decided on a basic vanilla sponge recipe:  6 oz of self raising flour, 6 oz soft butter (we used baking margerine which I have never used before but it was in Mum's fridge!), 6 oz caster sugar (finally REAL caster sugar thanks England!), 3 eggs and a teaspoon of vanilla essence and just mixed all of the ingredients together!


Cooking in a kitchen that is not your own is weird... not neccessarily bad but weird.  Not your measuring equipment, not the pans you usually use, everything in a different place etc...  I like my kitchen and my oven best of course, but I'm sure everyone does!  

One of our first dilemma's was which pan to use.  We had about 13 people coming for food so needed a cake big enough for around 15... There were no 2 matching tins which would have been big enough.  So instead we decided on one 8 inch springform sitting on top of a 9 inch pan.  This would be okay as I had the zebras that would sit on the edge which would be on show.


Hmm.  Problem.  The cakes were ridiculously thin :-(  How this happened we have NO clue.  I was sad.  So Mum did the next batch all in the smaller pan this time and still no luck but now at least we had three tiers big enough to feed everybody!  Was it the baking margerine... was it the flour... was it the pans... was it the batch?

I usually do a 4oz ratio in two 9" sandwich tins so why more ingredients wouldn't work I do not know but I know that it always works for me at home so that is weird but it's done now.  If the next cake I make here is bad then there's a problem however!


The next morning (her birthday!!) I made pink buttercream, and filled the cake with strawberry jam and the frosting.  All spread out on top it was ready for the fondant cake toppers I made when I did the nautical cake and took 3000 miles to Manchester!!


I actually changed my mind in the end, and placed 8 zebras around the top of the cake, I way prefer the more defined black and white zebras rather than the slightly more smudged grey ones!  The crumble around the edge is a cookies and cream crumble also taken with me from my baking cupboard!


I made the striped zebras by using white fondant, and coloured black fondant rolled out and cut out into little strips.  I then alternated black and white strips and lay them side by side before rolling a little more to put them together.  Then I used a zebra cookie cutter that has a plnuger to stamp the cookies (or for me, the fondant) with stripes!  I love these stamper cookie cutters - but my favourite so far is still the elephant I used in the baby boy cupcakes


All baked and done, time to find 20 candle holders!  Thanks trivet for being so kind and holding them so well for me!!

We had a DELICIOUS spread, English style BBQ where the meat is cooked indoors!  But boy it was good!  Finally got to enjoy some real sausages, my favourite kind!  Burgers (including lamb and mint sauce flavour!), chicken, my Grandad's homemade pizza YUM!  Salads, cous cous, crisps etc...


...and of course, cake for dessert!!


Candle time!  The pack was an 18-pack...can you spot the two odd ones out?!


Time to eat cake!  It perfectly fed all 13 of us, with a slice for my Aunt who couldn't be there and a little chunk leftover :-) 


We had a fun morning of presents (I bought her a mini cupcake tray with a recipe card entitled 'Eat more because they're mini' hehe isn't it true?! ... Along with some cupcake liners and other fun things!  Oh, and in case you're wondering - zebras used to be her favourite animal!

Excited to be back in Toronto now, with LOTS of new crafting and baking supplies!  Can't wait to use them all and share them with you!  Be back soon with more Summer posts!