
My original idea was to make some stuffed felt letters and numbers (I might still make these Krista!), but then when the ideas got whirring, I knew this was the correct choice.
A BOOK! Not just the alphabet or numbers, but more!


I began by writing a list of all the different ideas I had for pages, and well, that list got long...really long! I had to pick my very favourites (this time around anyway!). After a lot of research on types of books, how to bind them, what materials to use etc this is what I came up with:
I used a 'Mini' Avery purple binder (5 1/2 x 8 1/2 inches) which had a 1 inch width. I chose this for a few reasons... 1, you can't go wrong with purple in my opinion.... 2, it had a plastic covering to the binder which means it is 'wipe clean', and I could also add a front cover to it!
I added a Martha Stewart zippered pouch to the back (also in this cute mini size!), thinking about the future, for missing pieces, or for a quick tidy up :-)
And then for the pages, I chopped up some white card stock to match the mini half letter size pages, and punched 3 holes in them. I stuck down the no-tear clear hole reinforcers for bonus protection from toddler grabs!
I didn't glue the felt on right away, but did cut out sheets of coloured felt that would later stick right on to the white card stock (which was mainly for strength anyway)...

All prepped and ready to get to work on the pages! I have a lot of final product photos, and a few of the individual pieces as I went along, so I will just show you each page as it appears in the book!
Can you Count?
Created using brightly coloured star beads threaded abacus style onto thin purple ribbon.
Fiddly cutting out of numbers 1-10 in purple felt, and then lots of hot glueing to firstly attach the ribbons (triple counting the beads as I went along to make sure there were no errors!), and then 2 yellow ribbons to seal the edges.

Beads being prepared... this was the first page in the book and also the first page I started on. It was right here that I realised my initial 20 page ideas were probably not going to happen!


The text boxes were one of the final things I added to each page (you'll see more as you go along!). I used this great font 'Little Miss Prissy' and created a simple fun shaped text box in word. I thought this was a nice kid friendly font, but one that still had all the letters in proportion to one another and then, more hot glue stuck the card stock down :-)
Match the Shapes
Guess what you have to try and do here! That's right... match up the shapes to the outlines!

This is the point that I realised I had to work with each felt page BEFORE glueing down to the card. This allowed me to sew on it, draw on it, attach velcro etc before sticking it down!

5 shapes cut out firstly on card stock in various colours to use not only as a template, but also a backing to the felt. Then came the felt cutting... before being traced on the opposite page in permanent marker.

In the middle of each shape outline I then attached velcro (hook side) to the felt using my sewing machine. The sturdier the better I thought!
I glued each felt shape to the matching card, and then with adhesive velcro this time attached the loop side to the back of each.
Next step was to use a sheet of felt and machine sew it down (as if it were being hemmed so there was a folded outside edge) on the two sides, and the bottom edge. Voila, a pocket for the shapes to be matched!
That's right, I'm a music teacher so of course there had to be a musical page! For this one, I racked my brain about how I could make a musical page without using actual sounds. Was this falling into the 'quiet book' category, in which case making sounds might not be for the best!

What I went for was a 'pretend to play' page using felt pictures of a few instruments and encouraged the mimicking of playing, both in actions and/or sounds. Her mommy plays the guitar, and she loves to play the piano at her grandparents house so these were already instruments she knows ♫

A close up of some of the instruments as I went along. I hand stitched the names of the instruments on each one, as she gets older I hope she'll not only see the instrument but learn the words too :-) The piano was my FAVOURITE of course, but also the trickiest to create. Especially the keyboard part, which I used thick embroidery thread for the black keys, and then thin regular thread for the definition of the white keys.


What shall I wear today?
That's what this little girl needs to decide! My 'dress a girl' page was on the original list, and was always going to be a part of this book...no doubt about it!
I used to love paper dolls, do you remember? With those little fold down tabs? That's the kind of play thing I wanted to create here :-)


On the right hand side is the girl, felt body and hair with a small bit of hand embroidery for the eyes and mouth, she is wearing underwear, and with 2 velcro pads for top half and bottom half clothing!


For this lucky girl I made: 1 dress, 1 skirt, 1 pair of jeans, 1 t-shirt, 1 soccer shirt, 1 pair of shorts and a swimming costume (I still can't get the hang of saying swimsuit here!).
I used fabrics I had already in my stash, embellished a few pieces with some embroidery - the heart on the white shirt, the purple polka dots, and purple ribbon belt, the anchor for a water theme, and the pocket and zip detail on the jeans.

How to attach the clothes to the closet was something I had to think long and hard about... I had attached each item of clothing to card stock (just like the shapes) with a square of velcro on the back so I had to definitely include the opposite velcro side to the closet somehow, somewhere. I thought about individual pieces, as well as a pocket/pouch as I had done with the shapes but in the end (and I apologise you can't really see it in the picture) I did 2 strips of velcro machine sewn to the closet horizontally
across - just like your clothes rails :-)

I think on the day we gave our birthday gift, this was the favourite page so far!! This little girl was dressed up in all the different outfits, went swimming, played soccer and I think tried on everything in one combination or another, yey ♥
The weather today is...
Well today was pouring rain. Absolutely soaking wet all day. As was the day I made this page. However, for the 2nd birthday party at the farm it was glorious sunshine which was perfect!

I guess I am lucky in that I am making this in a country that really does see all weathers...when it's hot, it's really hot, but there are real snow days too! As well as some rain, and milder days. All the seasons for Canada!
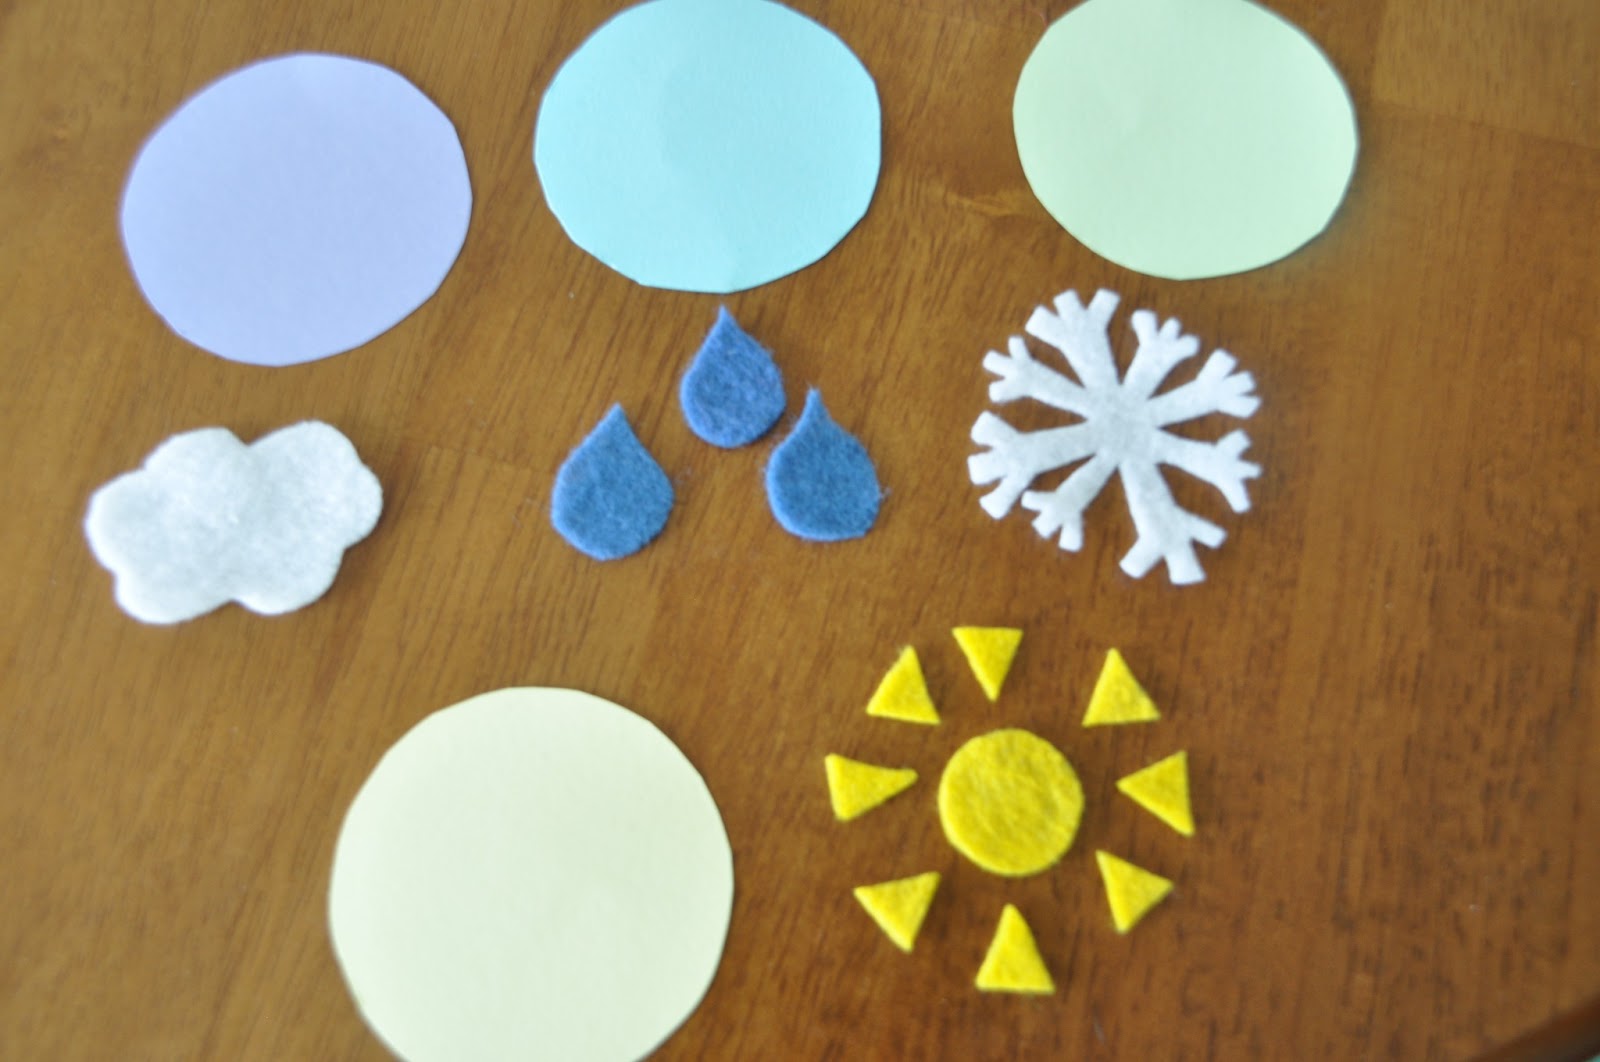

I think you get the idea by now - I used a combination of card stock... felt pieces (including a fiddly snowflake!), hot glue and then velcro to attach to the opposite velcro pieces sewn onto 4 points of the right hand page.


The text for this page was the largest of them all so that there was room for the decision to be made as to which circle of weather would fit finishing off the sentence 'The weather today is... ***'. Let's hope tomorrow is sunnier :-)
I hope that there have been enough details here in this post to inspire you to create a book like this for a little one in your lives :-) I had SO much fun making the book, creating the pages - thinking about specific ideas, creating fun learning experiences in a custom made book!
The hardest part of the book was maybe punching the holes! Felt does not want to be maimed! Scissors and cutting = fine... Hole punching in any way = not fine. In the end I used a meat thermometer and a potato skewer before making the hole slightly wider with thin scissors (weird, yes I know!) but that worked a treat, so go with what works for you... Or if you have a better idea for me, please let me know!!
Once the book was all made and done I kind of didn't want to give it away :-D But I did, I promise! She played with it through the day we were there with them all. So far the dress up page, and the shape matching were favourites, and I also saw some awesome pretend playing of instruments ♫ Yey!
.JPG)
Happy book making everyone! Have a great week :-)
Great tutorial! I love to see different ideas for quiet books! Visiting from Marvelous Mondays
ReplyDelete365ish Days of Pinterest
Thanks so much Nicole!! It was SUPER fun to make, and am now also totally into researching other quiet book ideas!
DeleteI love quiet books sadly I haven't got around to making one yet
ReplyDeleteThis was my first experience with them too but it was a lot of fun to make! I hope you get to soon :-)
DeleteSuch cute ideas! I am working on one for my son, it's slow going!
ReplyDeleteOoh yes I bet it is harder to find time with your son!! I'd love to see it when it's done :-D
DeleteWhat a great idea! We do tons of car trips and this would be perfect for both my kiddos! Thanks so much for linking up on Marvelous Mondays!
ReplyDeleteHappy Monday!
Ang
www.jugglingactmama.com
Thanks so much Angela! It was a lot of fun to make, and car trips for the little girl I made it for were definitely one of the reasons I did it!
DeleteThis is such a sweet book. I hope your children will keep it and pass it down to their children. It looks like a lot of love and work went into it.
ReplyDeleteI'm going to pin it and see if I can't make something like it (not quite as good, I'm sure) for my grands this Christmas....this gives me plenty of time. : )
Aw thank you Gail! That is such a sweet comment :-) I loved putting so much work into it, and am so pleased with how it turned out! It would be great to see the one you make :-) I have thought I might add a page for Christmas too!
Deletelove love love this! I'm going to make this for my little on. Pin'd to my Gonna Do board!
ReplyDeleteFound this via Marvelous Mondays :)
Yey thank you!!! So great to see it pinned, and so glad you could stop by to check it out :-)
DeleteThis is so amazing! It would be a great gift for a little one :)
ReplyDeleteFound on Handmade Tuesdays
http://3monkeysmommy.blogspot.com
Thanks Kristen! Great to have you here and glad you like it!
DeleteThis looks awesome!!! We would love it if you would link up at our linky party:
ReplyDeletehttp://www.lifewiththecrustcutoff.com/two-girls-and-a-party-link-up-22/
Live every Wednesday to Sunday.
Hosted by:
http://www.lifewiththecrustcutoff.com/ Parrish @ Life with the Crust Cut Off
http://thissillygirlslife.com/ Dana @ This Silly Girl's Life
We hope to see you there!
Thanks so much for stopping by!! I'm coming over to your blog now :-)
DeleteLove this idea! Perfect for my nephew and to add to baby shower gifts. Pinning it so I can make a few of them soon!
ReplyDeleteYey thank you Marie!! So pleased you like it! And yes, a great baby shower gift idea, good thinking! Maybe it could be a baby shower party idea? Everybody making a different page if you have some crafty friends!? Hmm, that's got me thinking - thanks!!
DeleteThis is a GREAT idea! I shared it on FB and G+ my DIL and I have to make this for her kids. They would love this.
ReplyDeleteFound you via Get Crafty.
Handmade at Warratahstree
Oh wow thank you for stopping by and also for sharing it!! Yey :-) Coming over to your blog now! I hope you do get to make one, and I'd love to see it :-)
DeleteI love these ideas!!! Especially the one with the little stars. Pinning the idea for later. :)
ReplyDeleteOur Simply Create Link Party is going on---I would love to have you share your quiet book!
Melissa
redflycreations.com
Thank you SO much Melissa! I love the stars too :-D I love the bright colours and thought they were perfect for little fingers to be counting! Coming over to your blog now, thanks for stopping by here :-)
DeleteЗамечательная книжка!!! Все так интересно и познавательно!
ReplyDeleteОгромное спасибо! Я так рад, что вы это нравится
DeleteHannah ♫
That is absolutely amazing! What a great idea, but looks kind of difficult : )
ReplyDeleteThank you so much Madalyn! It was a fair bit of work, but a lot of fun! It was more fiddly than difficult - but all worth it when it was done :-D
DeleteWhat a fun activity book! I should make something like this for my toddler! Great idea!!! I'm pinning it!
ReplyDeleteNavy Wifey Peters @ Submarine Sunday Link Party
Thanks so much!! I think toddlers are the perfect age for these books - keeps them occupied but also helps them learn in a fun way :-) I hope you get to make one! I'd love to see it if you do!!
DeleteI adore the ways you have for storing the pieces. The closet/wardrobe is perfect, and I too loved my paper dolls with the tabs on the outfits!
ReplyDeleteThis is super cool.. how did you bind all the final pages?
ReplyDelete