Showing posts with label handmade. Show all posts

Tuesday, 31 March 2015

Best Friend Clothes

 
After starting on the Christmas posts from last year, I've been excited to share this little set of outfits I created for Amelia and our best friends little girl and boy who will be our little one's greatest friends :-D
 
With a three year old's declaration when Amelia was just a few weeks old, that no they wouldn't be friends when she was older - that they already were friends, I thought I would put together some cute matching clothes for their Christmas gifts!  A little circle skirt with a fold down waistband for the girls, and an embellished shirt for the little guy!
 
A HUGE thanks to Delia Creates for the perfect tutorial on this skirt with a fold down waistband.  She so wonderfully describes the various ways you can make it, with different seams or waist options, as well as the information on all the sizing possibilities!
 
I used the 3-6 month size for our baby girl, and she's still able to wear it now which is perfect, especially as she can get her chubby little legs out without having to wear tights now we're not in the dead of Winter anymore!!


No tutorial photos for this project I'm afraid to say.  I don't know why I don't have any... Perhaps in the mad rush towards Christmas there just wasn't enough time.  But the original tutorial over on Delia Creates has great instructions and you can adapt it to many fabrics and ideas for various skirts.

The idea of creating two matching skirts was the easy part.  But I wanted to include everybody so I had to think of something for the little guy as well!  I contemplated pants of some kind, but was excited when I finally found a plain long sleeved shirt that I could embellish with an L (for his name) using the same fabric as the skirts.

I cut out a cardboard template of the L and cut two fabric pieces, one with the right side of the fabric up (the correct way around) and one in the reverse.  With wrong sides together I sewed the L together, and then turned the fabric inside out, right sides facing out now.  Using complementary thread, I top stitched around the L and onto the shirt.


Everything ironed, and gifted at Christmas time. 
And now I'm super excited to create lots more of these cute skirts for the Spring and Summer time :-)

Monday, 28 April 2014

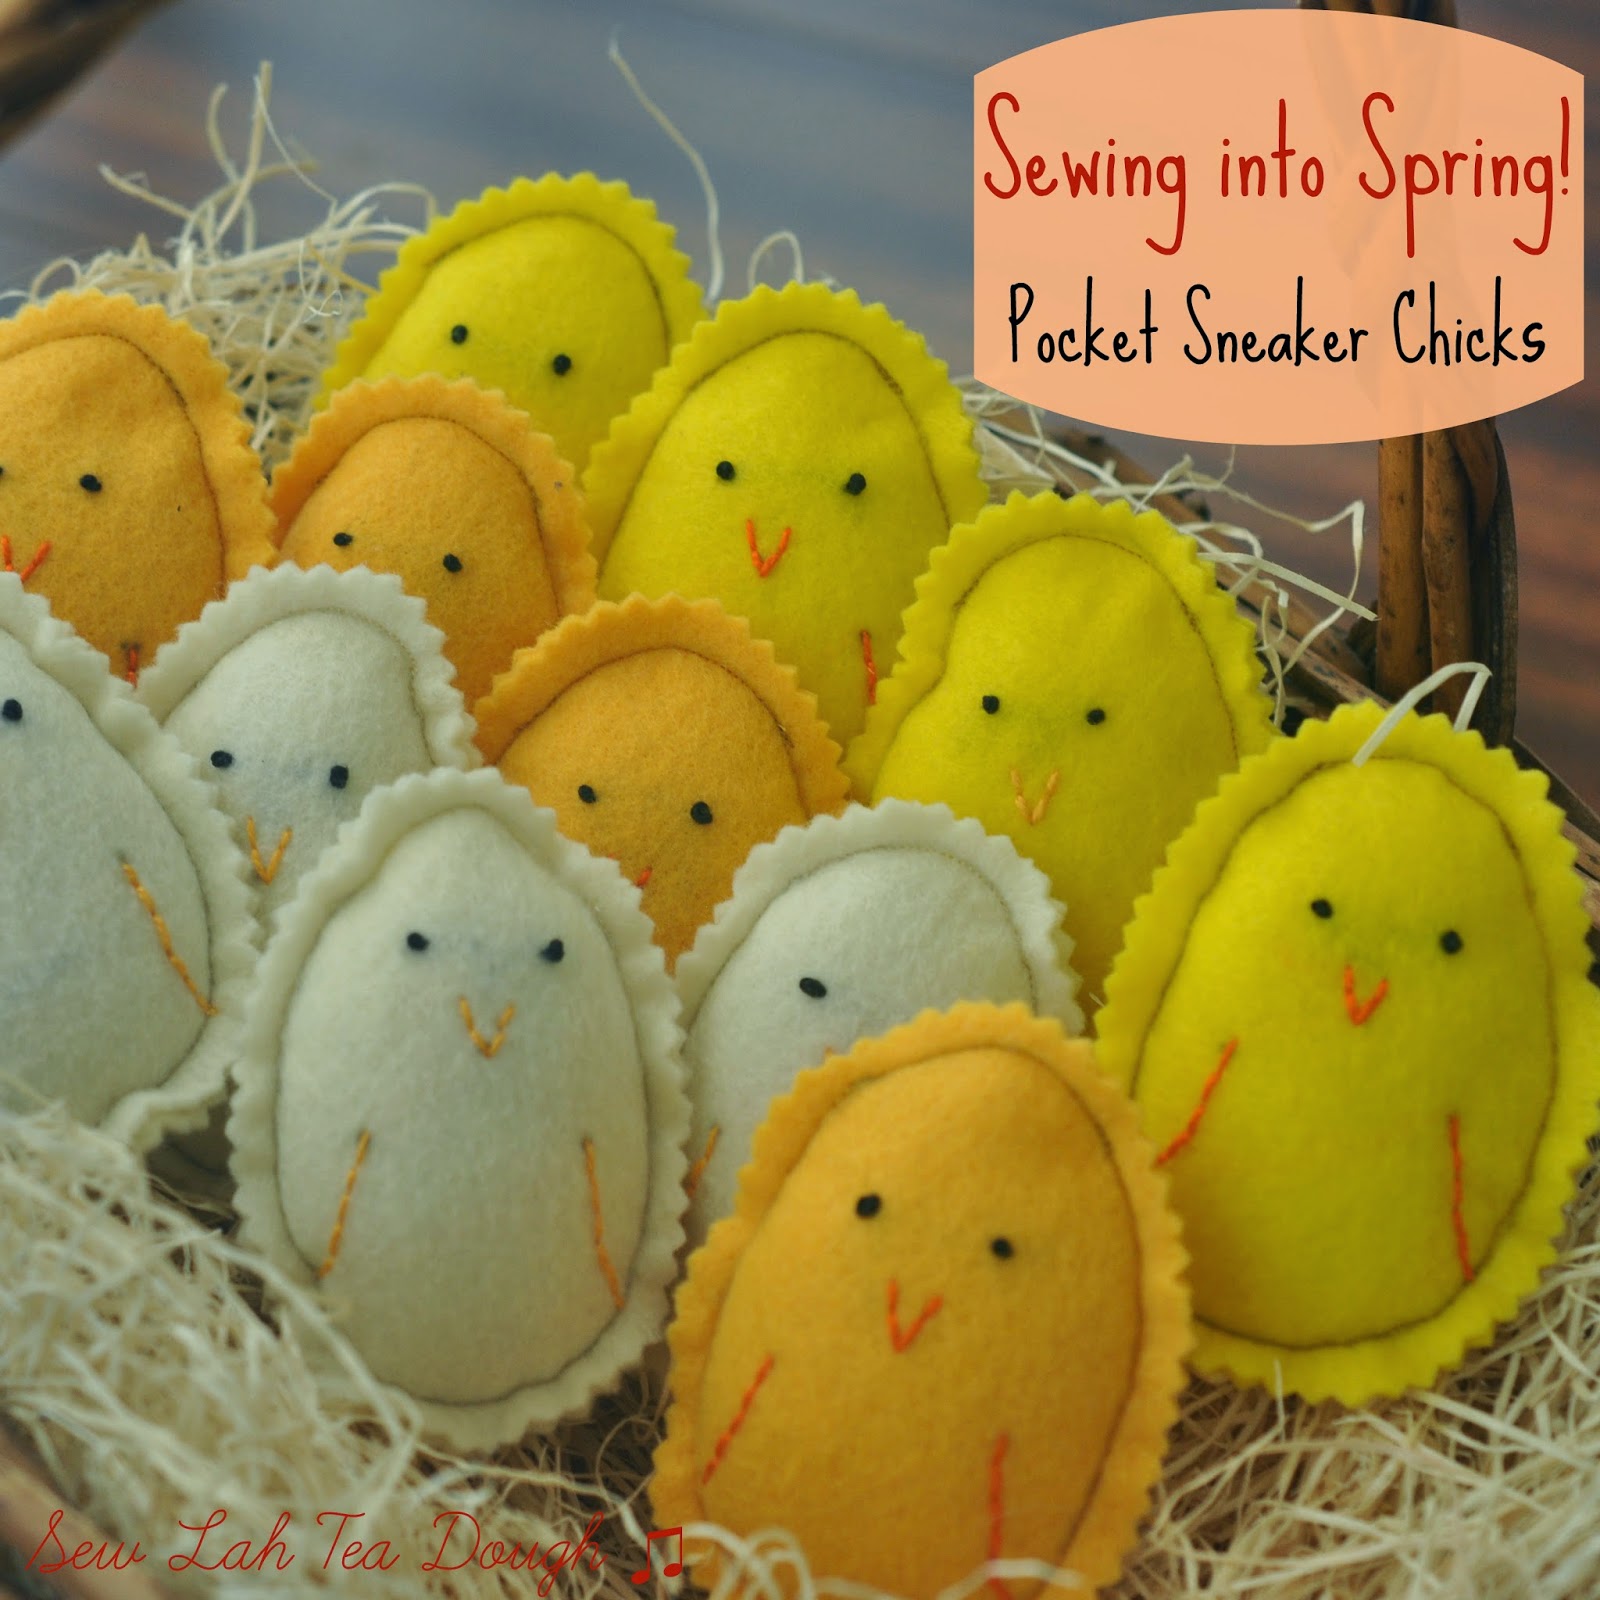
Sewing into Spring ~ Pocket Sneaker Chicks

Spring is here!!  ... And so is what seems like ALL the craziness happening at once.  Busy busy busy busy busy!  But I'm sure I want to still write a post per week, but forgive me - I didn't actually make these this week - but actually a few weeks ago for Easter.  BUT I didn't post them for Easter, so here they are!  Spring chicks :-)
 
 
Some of you reading might have seen what surprise they were used for over Easter, but well - it's not Easter anymore so I'll leave them as just my Spring Chicks!
 
 
I'm totally in love with the newest in my pocket sneaker series - these little chicks, and whilst they weren't used as my hearts and lucky charm pocket sneakers were for my husband - they were hand delivered at Easter and were very similar in the way I made them, and in their size, so I think I can go with the same pocket sneaker series!


Even making these on a time crunch I actually remembered to take a few photos as I went along so I can share with you how I made them!  They were nice and easy, and if you don't have a machine could be all hand sewn, although the machine did speed things up - and I like that.


When shopping for the felt I would use in this project I couldn't decide which yellow/orange/other chick colour would look best once they were all made... so ... well ... I got a variety and made them all!  In the end my particular favourite was the cream coloured chick, but after making them all and distributing them to family we shared the colours, and I think I liked them all, and especially liked that there were different colours to choose for different people so I'm glad I couldn't decide in Michael's that day!
 
 
Using a picmonkey egg I had seen on my travels through creating cover photos for my blog, I made the image in various sizes and printed it from a word document.  I had an idea of what size I wanted to make the chicks, but did trial and error on the actual egg size I printed to find the perfect one.  Oh yes, and I chose an egg shape for a chick?!  Coincidence it was all Easter themed but in my head the perfect "cute" chick shape would be an egg!


I cut out the egg in the size of my choice, and then backed it onto some sturdier card so I would be able to keep the template and use it again.

 
This little egg ready and waiting to be cut out to be the start of the chick making adventure!
 
 
I divided the felt sheet into 6 first of all and then traced the outline of the egg shape into each box.  Error here on my part was using a regular pencil and not a better pencil/pen that would fade away, but luckily most of my stitches covered the pencil markings in the end.
 
I then cut out each square of felt (but not the egg shape - this would be my sewing guide later on) in each of the three chick colours, eventually having 12 squares for each colour, 36 in total... which would make 18 chicks as each chick needed a front and back.
 
Whilst our youth group played a soccer tournament all day, I entertained myself by sewing the details on each front piece of the chick!
 
 
I'm most pleased with my chick eyes!! I advanced from my usual back stitching and actually tried a real embroidery knot!  Admittedly some eyes were bigger than others, but by the end of 18 chicks the eyes were nice and small, and tight - just what I wanted! 
 
I used a black embroidery thread for all of the eyes, and either a bright orange or pale orange for the beak and wing details, whichever matched the felt colour best.


Back home with all of the embroidery done it was time to stuff them and sew!  I pinned the fronts to the backs to secure each part together and then with the machine went around most of the egg shape with a coordinating thread (NOT the red that is in the picture for some reason... perhaps that was what was on the machine before I started with the yellows!). 


Leaving a small centimetre gap somewhere along the egg shape would allow me to pause on the sewing, and stuff the chicks before going back to the machine and finishing it off. 

The stuffing part is my favourite element of the 'pocket sneakers' I've made over the past year or so.  Giving them a chubby look and a soft padded feel, it was just what I envisioned for these little chicks.

 
So with all 18 chicks sewn around the edge of the egg shape, I cut out around the edge of the egg shape with pinking shears to give the pocket sneaker look of the jagged edge that I wanted!

 
And voila - here they all are, my little chicks in a basket!  I love how they turned out, and was a little sad to be giving these cute little guys away - although all for a good reason!  ... And I did get to keep a few for next Easter - I'll use them as decorations somewhere.
 
 
The chicks are super cute, and if you're happy doing some sewing are nice and easy to make!  If you try them out, do send me a picture :-)


Sunday, 9 June 2013

DIY Stamped Hankies for Dad

9th June is a perfectly acceptable time to blog about Christmas presents right?... Right?!

Well today I thought I would share with you one of our handmade Christmas presents from last year that was made before this blog was!  I had a bunch of posts ready to go for the day I made my blog public (nearly 6 months ago, yey!) but I thought I would save up all of our handmade Christmas gifts for other times, and this one seems pretty appropriate for this time of year seeing as they were the presents made and given to our Dads!  ... Yes we did similar, but not exact same gifts for both Jonathan's and my, Dad... does anyone else do this?  Doubling up on gifts?  It worked for us seeing as we will never share Christmas Day with both families (being 3000 miles away from one another!)

For Christmas last year we (I) did some sewing, some crafting with paint and then this gift, which Jonathan was able to be creatively involved in as well!!


We chose to do some DIY handkerchiefs, stamped with fabric paint in designs appropriate for each Dad.

First step:  find what you want to give!  We chose handkerchiefs and bought a big pack from Sears.  We struggled a bit to find perfectly plain white cotton ones, so many had fancy designs on - and often were in weird, impossible to find, places in the shop but eventually we got exactly what we wanted!

We prewashed the handkerchiefs (some of them frayed a little in the dryer - I guess we shouldn't have put them in) but there were enough left still intact for us to use.  They definitely needed a LOT of ironing to get the creases out, so we did all this before stamping.

We had already bought the fabric stamp pad from Michael's (much easier to find).  We thought about using paint, but then on seeing the stamp pad it was clearly what we wanted.  Easy to use and less mess!  They had a few different colours, but we chose black :-)


Next up were the actual stamp designs.  I had read a few posts about making your own stamps, using exacto knives, or using foam shapes on polystyrene balls but none of these seemed right for us.  I did, however like the idea of the foam shape mounted on something and after trying a few things, bottle caps were what worked for us.  All that diet coke that gets drunk in this house pays off in the crafting department yey!

No pre-cut foam shapes for us though... Checked out some craft supplies and stores but all the packs were kid oriented shapes... Why no 'Dad' pack!?  So we bought a few sheets of plain foam and got to work on some finicky drawing and cutting!


For Jonathan's Dad we used a car and a hammer, and for mine, the same car but a beer bottle instead of the hammer!  The foam was sticky back which meant it was super easy (after the teeny tiny snips I had to do to cut it out...I think I ended up using nail scissors!) to attach to the bottle cap.


Following the instructions on the fabric stamp pad, we then left the project to dry for at least 3 hours.  Then to set the ink, we ironed the hankies!  Covering the designs with a thin cloth, applying the heat of the iron (dry iron, on the cotton setting) for 2 minutes... But of course, your fabric stamp pad might be slightly different - do check the instructions!

Before we could package the gifts up, we had to machine wash them again on a gentle cycle and this time did a gentle tumble dry (because of the earlier fraying) and they were fine this time, phew!

We gave them one last iron before packaging them up ready for Christmas... And now you're probably wondering why I'm writing this post today - either very late, or very early in the year but well it is FATHER'S DAY next Sunday and seeing as we made this handkerchiefs for our Dads I thought it would be a great time to slot this post in here and hopefully give some inspiration and ideas for some DIY gifts for next weekend!

I wouldn't be able to share a Father's Day gift on my blog if it truly was for this year because then he would know what it was!  So instead, a reference to a previous gift - so no ruined surprises!


Have a fun week, enjoy creating some handmade Father's Day gifts - I'd love to see your projects... especially if you make these stamped handkerchiefs :-D

Sunday, 26 May 2013

Custom Baby Boy Onesies

Blues... Elephants... Bow ties... There must be a new baby in town!  And an extremely cute one at that.  As you saw last week with the cupcakes I made, our friends welcomed a new arrival to their family.  Our very sweet, new little friend Lucas has been born and we love him already!


I'm so excited to be sharing the onesie designs I created for him in the lead up to his birth.  Some personalised hand stitching, some applique, and my favourite - the custom made baby boy bow ties and button down onesie!


Since we found out our friends were having a baby boy my brain has been whirring with ideas about what to make and create for him (and them!).  The bow ties were my first and favourite idea, followed by the personalised hand stitched name and date, and then with the making of a toy elephant (I'll be blogging that soon) I thought a matching elephant onesie would be fun.


I first purchased 3 onesies - 2 in size 0-3 months, and 1 in size 6-12 months so that there was a variety for him, as well as getting 2 short sleeved, and 1 long sleeved in white, light blue and dark blue!  Oh the choices!  I definitely wanted to work with different shades of blue for him, not only for 'blue for a boy' but of course he is a Toronto Maple Leaf fan, so blue will definitely be playing a large part in his life!! :-)


The biggest onesie, the size 6-12 month was accessorised with light blue buttons and velcro patches for the flannel bow ties that just stick right on, and come right off for mixing and matching (and washing)!  He'll be the most handsome, smartest little boy around :-)

I'm going to write a separate tutorial post about the bow ties, with more details on sizing and measurements but for today it's just the photographs of the finished products!  


I'm also super excited that Lucas' photographer Mommy - Krista, who specialises in newborn, maternity and family photography in the Toronto area has already snapped a shot of him wearing his personalised hand stitched onesie.  A special date to remember for this new baby boy ♥ 

Now these gifts are given, I've been wondering what is next!  There are many more projects on the 'to do' list...I'm just waiting for a little more time in the Summer :-)

I've also been thinking about adding these bow ties to my rather small Etsy shop!  What do you all think?  Would you and your little boy be interested?! 


More on these onesies coming soon!  Stop by again soon for the tutorials on my applique elephant, the stuffed toy elephant I made as well as of course, these bow ties :-)


While you're here, check out the incredible photography business our friend and cousin runs here in Toronto.  Taking a little break while she enjoys time with their new baby gives you lots of time to read her blog and check out her great website full of beautiful babies and their families :-)  

And don't forget my new Facebook page is always looking for new followers and friends!  Click here to 'Like' my page and get Sew Lah Tea Dough updates right to your newsfeed.

Thanks for reading!

Tuesday, 20 March 2012

Mother's Day Tea

Well what better way to start off my 'Tea' category than to blog about tea!  This year I thought for Mother's Day creating some handmade tea bags would be perfect.

My Mum used to only drink regular tea.  Just the normal.  But I then kept discovering some green tea at home when I visited and in general it seems that loose leaf tea is all the rage...so I put that together and created tea bags filled with our choices of loose leaf teas!  I ordered the tea bags from ebay which would seal with heat - an iron!  We filled them with the teaspoon or so recommended for a cup of tea, added string and a little label to distinguish each one and voila, handmade tea bags!


To match the gift, I made a tea themed card to go with these.  Some purple card, a white lacy doily and a cookie cutter created this card.  Loved using doilies to make cards, and could do any simple shape with them for a really cute feminine card or scrapbook piece.


Happy Mother's Day Mum! ♥