Showing posts with label craft. Show all posts

Monday, 28 April 2014

Sewing into Spring ~ Pocket Sneaker Chicks

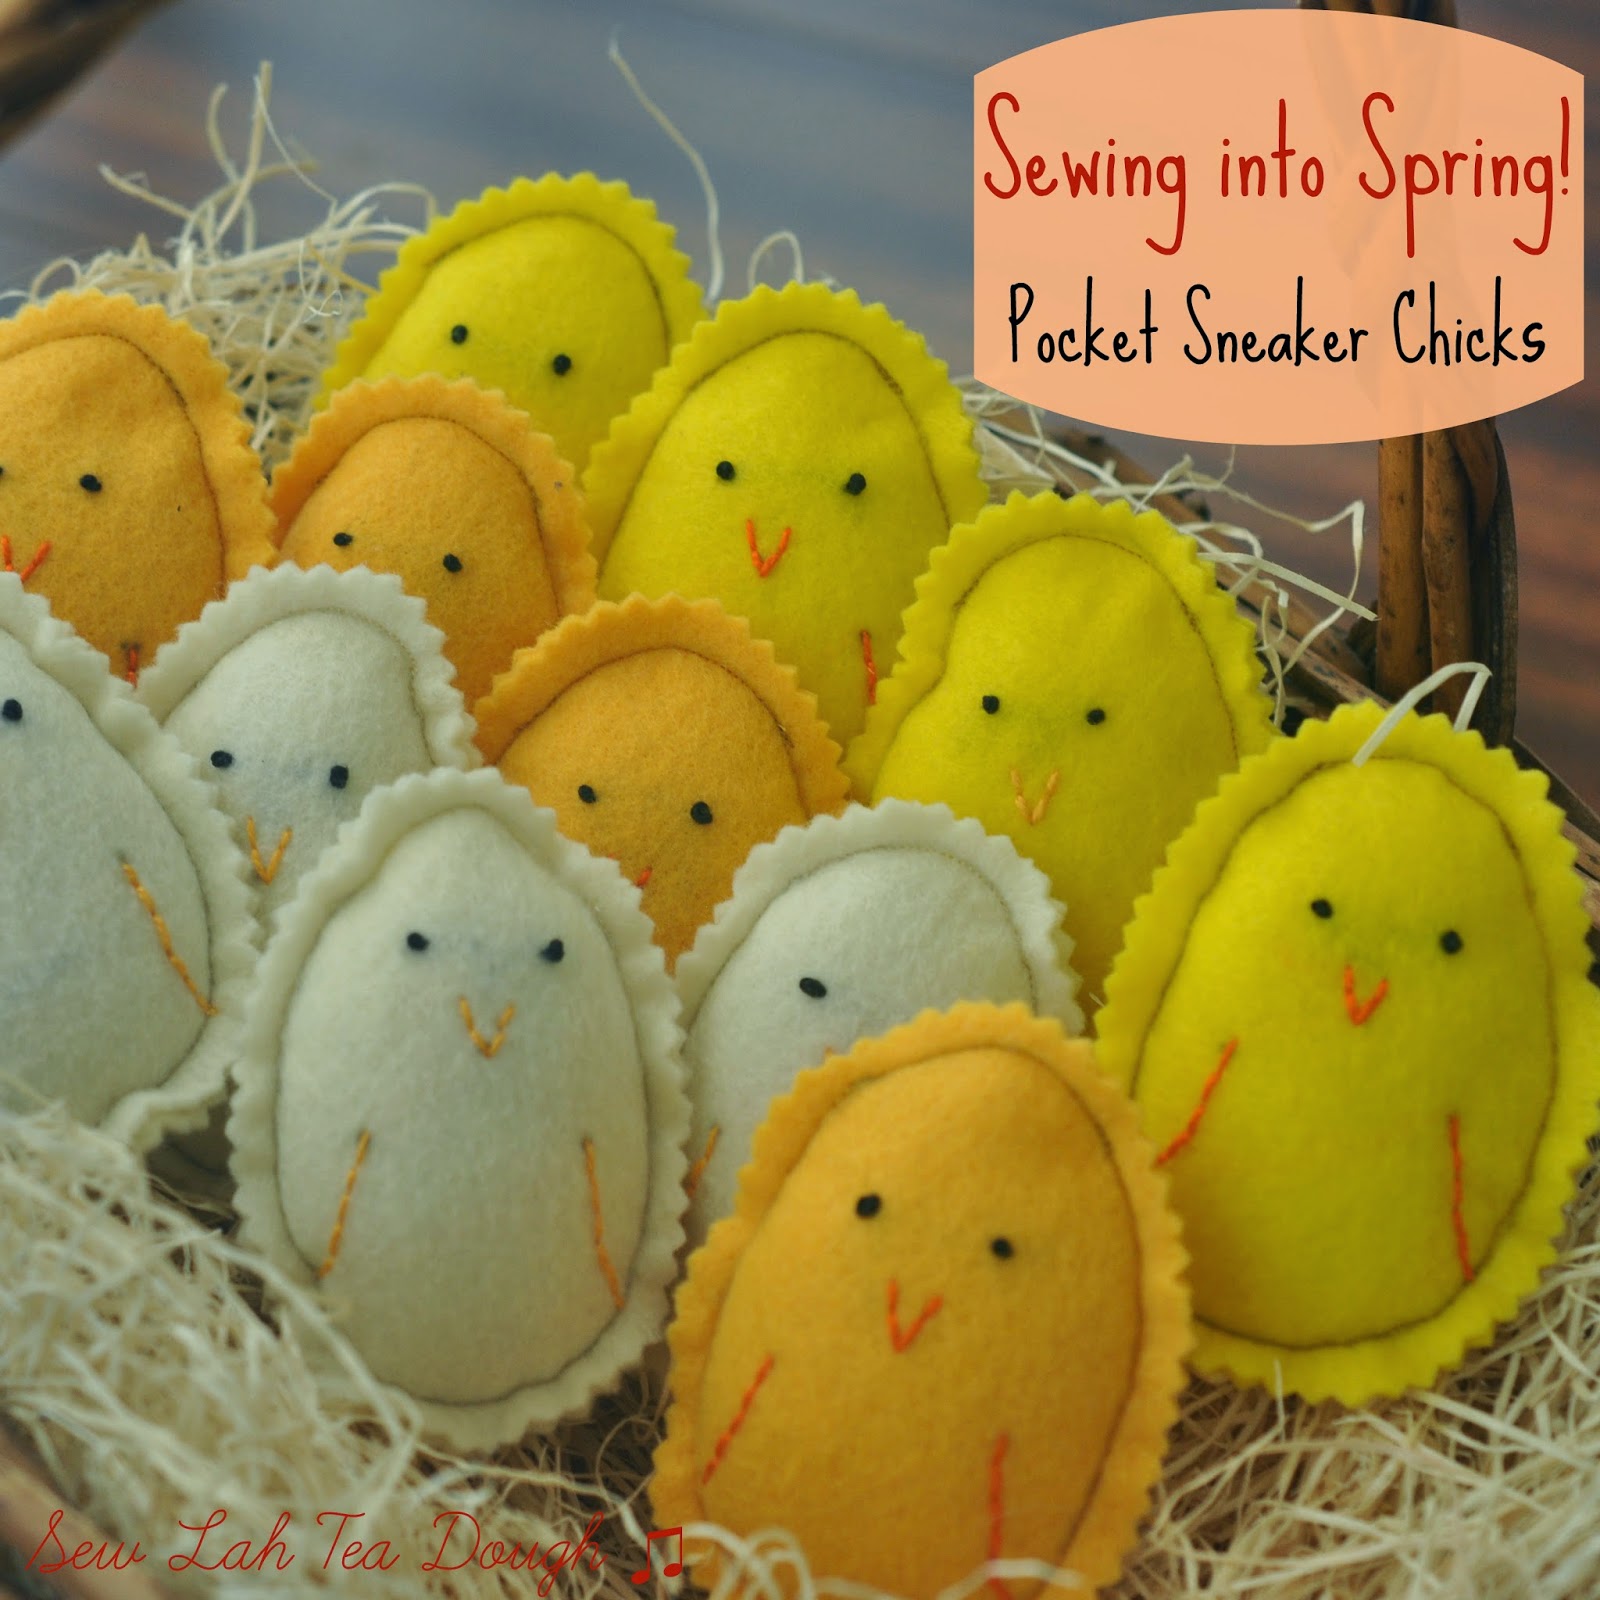
Spring is here!!  ... And so is what seems like ALL the craziness happening at once.  Busy busy busy busy busy!  But I'm sure I want to still write a post per week, but forgive me - I didn't actually make these this week - but actually a few weeks ago for Easter.  BUT I didn't post them for Easter, so here they are!  Spring chicks :-)
 
 
Some of you reading might have seen what surprise they were used for over Easter, but well - it's not Easter anymore so I'll leave them as just my Spring Chicks!
 
 
I'm totally in love with the newest in my pocket sneaker series - these little chicks, and whilst they weren't used as my hearts and lucky charm pocket sneakers were for my husband - they were hand delivered at Easter and were very similar in the way I made them, and in their size, so I think I can go with the same pocket sneaker series!


Even making these on a time crunch I actually remembered to take a few photos as I went along so I can share with you how I made them!  They were nice and easy, and if you don't have a machine could be all hand sewn, although the machine did speed things up - and I like that.


When shopping for the felt I would use in this project I couldn't decide which yellow/orange/other chick colour would look best once they were all made... so ... well ... I got a variety and made them all!  In the end my particular favourite was the cream coloured chick, but after making them all and distributing them to family we shared the colours, and I think I liked them all, and especially liked that there were different colours to choose for different people so I'm glad I couldn't decide in Michael's that day!
 
 
Using a picmonkey egg I had seen on my travels through creating cover photos for my blog, I made the image in various sizes and printed it from a word document.  I had an idea of what size I wanted to make the chicks, but did trial and error on the actual egg size I printed to find the perfect one.  Oh yes, and I chose an egg shape for a chick?!  Coincidence it was all Easter themed but in my head the perfect "cute" chick shape would be an egg!


I cut out the egg in the size of my choice, and then backed it onto some sturdier card so I would be able to keep the template and use it again.

 
This little egg ready and waiting to be cut out to be the start of the chick making adventure!
 
 
I divided the felt sheet into 6 first of all and then traced the outline of the egg shape into each box.  Error here on my part was using a regular pencil and not a better pencil/pen that would fade away, but luckily most of my stitches covered the pencil markings in the end.
 
I then cut out each square of felt (but not the egg shape - this would be my sewing guide later on) in each of the three chick colours, eventually having 12 squares for each colour, 36 in total... which would make 18 chicks as each chick needed a front and back.
 
Whilst our youth group played a soccer tournament all day, I entertained myself by sewing the details on each front piece of the chick!
 
 
I'm most pleased with my chick eyes!! I advanced from my usual back stitching and actually tried a real embroidery knot!  Admittedly some eyes were bigger than others, but by the end of 18 chicks the eyes were nice and small, and tight - just what I wanted! 
 
I used a black embroidery thread for all of the eyes, and either a bright orange or pale orange for the beak and wing details, whichever matched the felt colour best.


Back home with all of the embroidery done it was time to stuff them and sew!  I pinned the fronts to the backs to secure each part together and then with the machine went around most of the egg shape with a coordinating thread (NOT the red that is in the picture for some reason... perhaps that was what was on the machine before I started with the yellows!). 


Leaving a small centimetre gap somewhere along the egg shape would allow me to pause on the sewing, and stuff the chicks before going back to the machine and finishing it off. 

The stuffing part is my favourite element of the 'pocket sneakers' I've made over the past year or so.  Giving them a chubby look and a soft padded feel, it was just what I envisioned for these little chicks.

 
So with all 18 chicks sewn around the edge of the egg shape, I cut out around the edge of the egg shape with pinking shears to give the pocket sneaker look of the jagged edge that I wanted!

 
And voila - here they all are, my little chicks in a basket!  I love how they turned out, and was a little sad to be giving these cute little guys away - although all for a good reason!  ... And I did get to keep a few for next Easter - I'll use them as decorations somewhere.
 
 
The chicks are super cute, and if you're happy doing some sewing are nice and easy to make!  If you try them out, do send me a picture :-)


Monday, 14 October 2013

Preserved Peaches one day, Peach Bundt Cake the next!

Happy Thanksgiving everyone!  To all the Canadians celebrating today, I hope you have a fun filled day with lots of turkey, family and friends.

We had an amazing weekend away, I was spoilt by my husband to a surprise weekend in the beautiful Haliburton, Ontario surrounded by amazing Fall colours, wild turkey, deer and lots of lakes!  And then yesterday we got to spend the day with Jonathan's family and cousins at their cottage with a delicious Thanksgiving dinner.  What a great weekend :)

So now, it's a bonus day off work and it's catch up day!

... Starting with... my Peaches and Cream Cake that I promised you a couple of weeks ago.  I made this peach bundt cake for our annual choir day out and meeting which of course took place along with a pot luck!  You already saw the DIY cute and easy cake bunting I made to music it up but the cake hasn't been blogged yet.  So today here it is!  


We were so lucky to be given a delicious jar of preserved peaches from Jonathan's grandmother a few weeks ago, so when I was thinking of something to make for the choir (thinking about what would feed everyone, but also be kind of new and fun to try) these jumped into my brain.  Peaches!  I've never baked with peaches before so this was perfect... off to the internet to find a recipe.


I found this great Week of Menus recipe that I slightly altered, but it served a perfect starting point for this bundt cake :)  

For the cake...

Ingredients:

3 cups all-purpose flour
1/2 teaspoon baking powder
1/2 teaspoon baking soda
1/2 teaspoon salt
1 cup unsalted butter
1 3/4 cups granulated sugar
4 large eggs
1 vanilla pod, split (the original recipe called for 1 pod, but I actually only had 1/2 of one!  The flavour still came through just fine luckily!)
1 cup sour cream
1 cup diced peaches (as you know, I used preserved peaches, but you can go with fresh if they're in season!)

Method:

1.  Preheat oven to 350°F/ 180°C and grease and lightly flour the inside of a 10 inch bundt pan.


2.  Whisk together the flour, baking powder, baking soda and salt in a large bowl and set aside for later.


3.  Using a mixer, beat the butter until creamy (around 2 minutes) and gradually add the sugar and beat at medium-high speed until the mixture is light and fluffy.


4.  Beat in the eggs, one at a time.  Beat mixture after each addition.  Scrape the sides of the bowl down as necessary.  


5.  Scrape out the vanilla seeds from the pod and beat into the egg mixture. Keep the empty vanilla pod - don't throw it out yet, you'll need it for the syrup!

6.  At a low speed, add the flour mixture in three additions, alternating with the sour cream but beginning and ending with the flour.


7.  Scoop half of the batter into the bundt pan and spread with a spatula.

8.  Add diced peaches to the first half of the batter.  I chose to keep the peaches in the centre, so that the batter would completely surround the peaches keeping them right in the middle of the cake, with none escaping out of the sides!


9.  Scoop the remaining half of the batter on top of the peaches.  Spread with a spatula to smooth down the top surface.


10.  Bake in the centre of the oven for 50 - 60 minutes (mine actually took 65 minutes to be precise!  Keep an eye on it and test with a cake tester/skewer to check it is cooked through).  Cool the cake in the bundt pan on a cooling rack for 10 minutes then flip out onto another cooling rack placed on top of a baking sheet or tray to continue cooling.  


And for the syrup - make while the cake is baking...

Ingredients:

1/3 cup fresh peach puree
2/3 cup granulated sugar
1 tablespoon peach syrup from the jar of preserved peaches OR 1 tablespoon orange juice
1 empty vanilla pod (kept from earlier in the cake baking!)


Method:

1.  Take 4 slices of peach (leftover from the jar of preserved peaches), and puree it until smooth.  Depending on your size of slices it may or may not make exactly 1/3 cup of puree but that's what you're aiming for - try it until you get that much puree!


2.  Combine peach puree, sugar, empty vanilla pod and syrup (or juice) in a small saucepan and cook over medium heat, stirring until the sugar dissolves - around 3 or 4 minutes.


3.  Remove the pan from teh heat, and using a pastry brush, dab the syrup generously all over the surface of the warm cake, allowing it to soak into the cake before giving it another coat.  Then let the cake cool completely.


Then when you're done making and baking, it's photo time of course!

For this cake, as it was for a choir event I was excited to try making some cake bunting... Hehe BUNTING for the BUNDT cake (joke credit to my husband as he proof reads this!)...

I thought this would be the perfect cake for some bunting... with the poles on either side of the cake, music flags strung out over the hole of the cake.  If you missed the tutorial on this, click here!  It was really quick and easy to make, and I thought it was a really cute little way to glam up the cake :)


And of course, a little notecard to tell everybody what the cake was!  I like to know what I'm about to eat, especially if, on first glance you can't exactly see what would be inside, or what the flavours are.


I chose to call this a 'Peaches and Cream' cake... I know traditionally, peaches and cream would be sliced peaches and whipped cream - but the peaches are there for sure, and the addition of the vanilla pod gives it the vanilla cream flavour :)

It tasted really delicious, the preserved peaches were even better than fresh peaches in my opinion - because they have been soaking in a delicious peach sugar syrup for a while before even going into this cake!  The cake was moist, and had such a thick peach glaze on the outside which gave it a sugary crunch before the mouthful of cake!


Fresh peaches, peach syrup, along with vanilla cake = yum!  

Any more jars of preserved peaches out there, I'd be happy to receive them!!!

Tuesday, 20 March 2012

Mother's Day Tea

Well what better way to start off my 'Tea' category than to blog about tea!  This year I thought for Mother's Day creating some handmade tea bags would be perfect.

My Mum used to only drink regular tea.  Just the normal.  But I then kept discovering some green tea at home when I visited and in general it seems that loose leaf tea is all the rage...so I put that together and created tea bags filled with our choices of loose leaf teas!  I ordered the tea bags from ebay which would seal with heat - an iron!  We filled them with the teaspoon or so recommended for a cup of tea, added string and a little label to distinguish each one and voila, handmade tea bags!


To match the gift, I made a tea themed card to go with these.  Some purple card, a white lacy doily and a cookie cutter created this card.  Loved using doilies to make cards, and could do any simple shape with them for a really cute feminine card or scrapbook piece.


Happy Mother's Day Mum! ♥