Showing posts with label Etsy. Show all posts

Sunday, 20 October 2013

Getting ready for Movember 2013!

2 WEEKS TO GO EVERYONE!


2 weeks until the little spikes of hair start to peek through.

2 weeks until a dark shadow starts to appear on our friends', husbands', brothers' upper lip.

2 weeks until men start to compare how much facial hair they can grow.

2 weeks until the funny wax, the mini combs and the darker hair dye comes out to play.

2 weeks until MOVEMBER everybody!


This is one of my favourite times of the year... When everything MO comes to life!  Mo cookies, mo cakes, mo t-shirts, mo accessories and oh yeah - the real thing as well, all those men walking along the street with their little moustaches.  I love seeing and knowing those people participating in Movember!

And why wouldn't you?  It is SUCH a worthwhile cause and has become really popular in recent years!  This year will be the 3rd year my husband has grown a moustache for Movember and the 2nd year I have officially been a Mo-Sista also collecting donations and doing my bit to support him in his growing!

Movember is a moustache growing charity held annually each November to raise awareness and funds for many aspects of men's health, in particular about prostate cancer.

Last year I started my Etsy store selling Moustaches for Movember... I wanted to be able to wear a moustache as well as just watching my husband's grow :)  And so, my hair clip and jacket pin moustaches were born!  Here's the mini post I wrote about last year's collection of MOs!

This year I have got to work again, making new moustaches in a variety of new and exciting colours.  On Thursday I sat down FINALLY to do some sewing.  I haven't used my sewing machine all Summer and I could hear it crying for me.... I have missed it but I'm really glad I got it out and got sewing this week - all is well now!

This isn't a tutorial as such, but rather just a run down on my sewing day earlier this week - making a couple of moustaches for an Etsy order ... anddd a couple just for me and Jonathan :-)

All my supplies out, and ready to start moustaching!


Two different grey colours for my order, and a special teal just for me :)  It is my favourite after all, and I thought it would look great against my grey jacket I've been wearing a lot so far this Autumn.


Templates from last year in small, medium and large all ready to go!  This week I made 2 medium for the order, and 2 small for us.  I definitely have to make these more sturdy if I am going to keep using them!  Right now they're just paper, but I'm thinking of transferring them to something thicker soon.


Marked out with tailor's chalk and ready to be cut out...


All done and ready to be sewn up :)


Now to find some coordinating thread... I just about had the perfect ones.  It did mean for a lot of changing over of the spools on the machine... but oh well, it was only 4!


4 moustaches sewn up, stuffed with Poly-Fil and here they are ~ cute little chubby moustaches ready for their clips to be attached.


The smaller ones are definitely harder than the medium and large - just a bit more fiddly, and harder to stuff than the bigger ones... but I do like the way they look!


A bit of posing for my 4 moustaches while they were waiting for the glue gun to heat up!


All finished :)  1 hair clip barrette... and 3 bar pins to attach to a jacket, on your purse, your backpack... to wear as a bow tie, or maybe even a tie clip!?


So there I was a little while later, 4 moustaches richer!  2 to send out to my first Etsy customer of the Movember season (yey!) and the others for our house!  I chose a Toronto Maple Leafs blue for Jonathan and my favourite teal colour for me, but perhaps depending on the outfit I'll be borrowing his as well :-P

Here are the other colours on offer this year!  Lots to choose from ...


And with this new set of moustaches in all new colours I thought a new business card was needed too.

A few weeks ago I worked REALLY hard on the new blog header (look up!), and also my Facebook cover photo and Etsy profile picture so I thought it was time to put some of these to use on paper as well!  So I worked EVEN HARDER in Picmonkey and designed a few social media icons first (wow you graphic designers do fiddly work!) and then put it all together into a business card... 


For now they are just printed at home on cardstock, and the back side of it printed a little off colour so I definitely need to get these printed in better quality BUT for now, they'll do!  I'm pretty pleased with how they look :)  What do you all think?!  Did I miss anything?  Design feedback very welcome!

And so, with my thank you tag attached these MOs are ready to be delivered, in time to be worn right from November 1st.


In addition to being a really fun little project for my Etsy store (which yes, isn't that big!) I'm also donating $2 per MO to Movember for every moustache sold from now until October 31st!

Here's to a really successful Movember 2013 and please do go check out my Etsy store to see my listings =D

And remember, whether it's a real hairy one, or a hair/jacket clip...

* Wear your moustache with pride this Movember *


Saturday, 6 July 2013

Bow ties are cool... Baby bow ties are cooler...

... and cuter too!

Nearly 8 weeks ago I blogged about the new baby boy elephant cupcakes and custom baby boy onesies I made for the arrival of a sweet baby boy - a very cute and squishy addition to our friends' family.  Wow 8 weeks!?  Seems like a long time already for this little baby, which means I think it is definitely time I blogged more about the custom onesies I made, just as I promised.

When I first blogged about the onesies I was so thrilled with everybody's kind words and compliments, and especially excited to see, that just like me - everyone's favourite seemed to be the bow tie onesie!  Yey!  I'm still so happy with how it turned out, and I love that everyone else did too - thank you for your comments and repins :-)


So today I bring you the tutorial for the bow tie onesies.  I'll share what I did and also what I plan on differently next time - I'm wondering if these might make it onto my Etsy shop.  Right now you'll just see my moustache hair clips/men's bow ties/lapel pins so it's pretty lonely on the Sew Lah Tea Dough Etsy shop so maybe these will get there soon.  What do you think?  Would these be something that catch your eye while browsing Etsy?

Firstly I purchased a white onesie (this one was a size 6-12months, thinking he could grow into his 'smart suit' in a few months time!).  I chose white to act like a smart white dress shirt :-)

I knew that I wanted to create 2 bow ties so that the colours/patterns could be interchangeable... and then to find a way to attach the bow ties, meaning that I could make future bow ties with the same fixings on for endless possibilities.  That means everything you'll see will be twice over as I made 2 bow ties but the measurements I give will be for 1.

So here goes.  I chose some really cute and soft flannel fabric I got in JoAnn's on my most recent US trip.  I knew a baby was coming so this definitely inspired the purchase, and it worked perfectly for the bow ties - I love the fabric design and thought it was so appropriate for a baby boy.  Thank you JoAnn's!

1.  Start with 1 rectangle of fabric cut to 9" x 4" and 1 smaller piece cut to 2.5" x 1.5".

2.  Fold right sides in lengthwise and pin.  These are the top edges you are going to sew shut.


3.  Machine sew in a similar colour thread (I used white) along the pinned top edges.  (As these aren't huge projects they are probably something that could be hand sewn as well if you don't have access to a machine)


5.  Turn the fabric inside out so that the right side is now showing and admire your pretty baby fabric you chose :-)


You will then have tubes of fabric, one big long rectangle that will be the main part of the bow tie, and the smaller one that will be the wrap around middle part.

6.  Turn the seam so that it sits in the middle of the back and iron flat.


7.  Working first with the large rectangle, fold the 2 ends towards the middle.  I actually overlapped one side more so than the other - I figured if it was going to be on show then having only 1 edge visible would be better than 2!  And also once I wrapped around the smaller rectangle this would then go around both edges potentially making it more secure.


8.  Tack down this middle overlap just to attach them together which will make it easier to work with when you add the small middle band.

9.  Squeeze together the middle of the bow tie and aim for nice symmetrical pleats for the bow tie effect!  I was really happy with how one came out, and the other didn't do as nice of a pleat but that's okay!  


10.  Oopsie that may have been my last photo.  Luckily it's almost the final step, and finally time to use that small rectangle that was oh so fiddly to turn right side out!   Take this rectangle tube and fold around the middle of the bow tie.  Hand sew together at the back.  I sewed through the 2 edges, but also made sure that some stitches went through the actual bow tie so that it would move side-to-side.

Time to attach the velcro or whatever you want to use to get this bow tie to stay on your little one's outfit!

11.  I had chosen to use velcro squares - with two attached to the onesie just underneath the collar spaced apart based on your bow tie - just double check and make a mark where you want them to be sewn on!  This meant I needed the opposite sides of velcro squares to attach to the back of the bow ties.  I'm afraid I don't have a photo of the back (and right now I'm saying to myself "why was I so silly not to take one of the back side?!")... but I attached a square to the under side of the bow tie - one on each side of the bow.  Hand sewing the velcro was tough!  I really appreciate usually being able to use a machine for this! 


I am sure there would be a way of figuring out which part would eventually be this velcro section and attach it first, but I haven't got there yet.

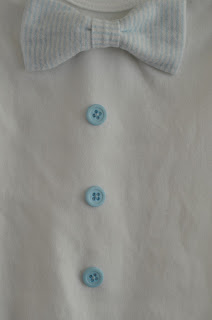
All done!  2 cute and soft bow ties ready for the outfit and the new baby (who, at the time of finishing the gift was still warm and cosy and not born yet!)


My other idea which I think I would use as another option if I made these more often, for more flexibility would be to attach small bar pins either by sewing them on, or hot glueing them down so that the bow tie could be attached to any outfit.  

But for this time I wanted the two interchangeable bow ties for 2 outfits in one, so went with velcro not only for easy attaching, but also meaning the bow tie could be removed so the outfit could still be washed... Very necessary I think :-)

I also should mention, that I chose to make the onesie even smarter with some pale blue buttons sewn down the centre of the onesie.  That's totally optional - but I definitely think it adds a nice contrast in colour to the white fabric as well as being nice and fancy to make your little one look so grown up!


I love these bow ties!  And have lots of material left, and can't wait for a chance to make some more.  Looking forward to when the new little one is big enough to fit into the outfit and we can see him looking super dapper ♥


This final photo is just as I was packing everything up.  Don't you love the 'Stitched with ♥' ribbon!?  It was a super exciting little gift from my Mum sent from England.  Just had to use a little of it for this present :-)  Thanks Mum!

I'm so glad I've finally posted this tutorial - I hope you have a chance to create a cute little bow tie for your little man.  I loved coming up with this onesie - accessories for baby boys are definitely not as easy to come up with as little girls' but I did really enjoy this project :-)  

Definitely going to make some more, and I'd love to hear what you think - do you reckon they'd make for a good Etsy sell!?  And do send me your pics if you make some of your own!

Have a great week everyone!