

It's a super sad week for me here, as I'm saying goodbye to all of my piano students, many of whom I have taught for 4/5 years now - some since I arrived in Toronto and started teaching here!
With all the other excitement happening this year, my time with these students has come to an end - at least for now! I'll be away from teaching piano for a few months but I'm so pleased with how I chose to celebrate my students and my time with them.
In the past, for Christmas and Summer gifts I have mainly baked their treats! My favourites have been Musical Shortbread and High Five Cookies :) But this little project was something baked in the oven, that, for once in my life wasn't a cake!
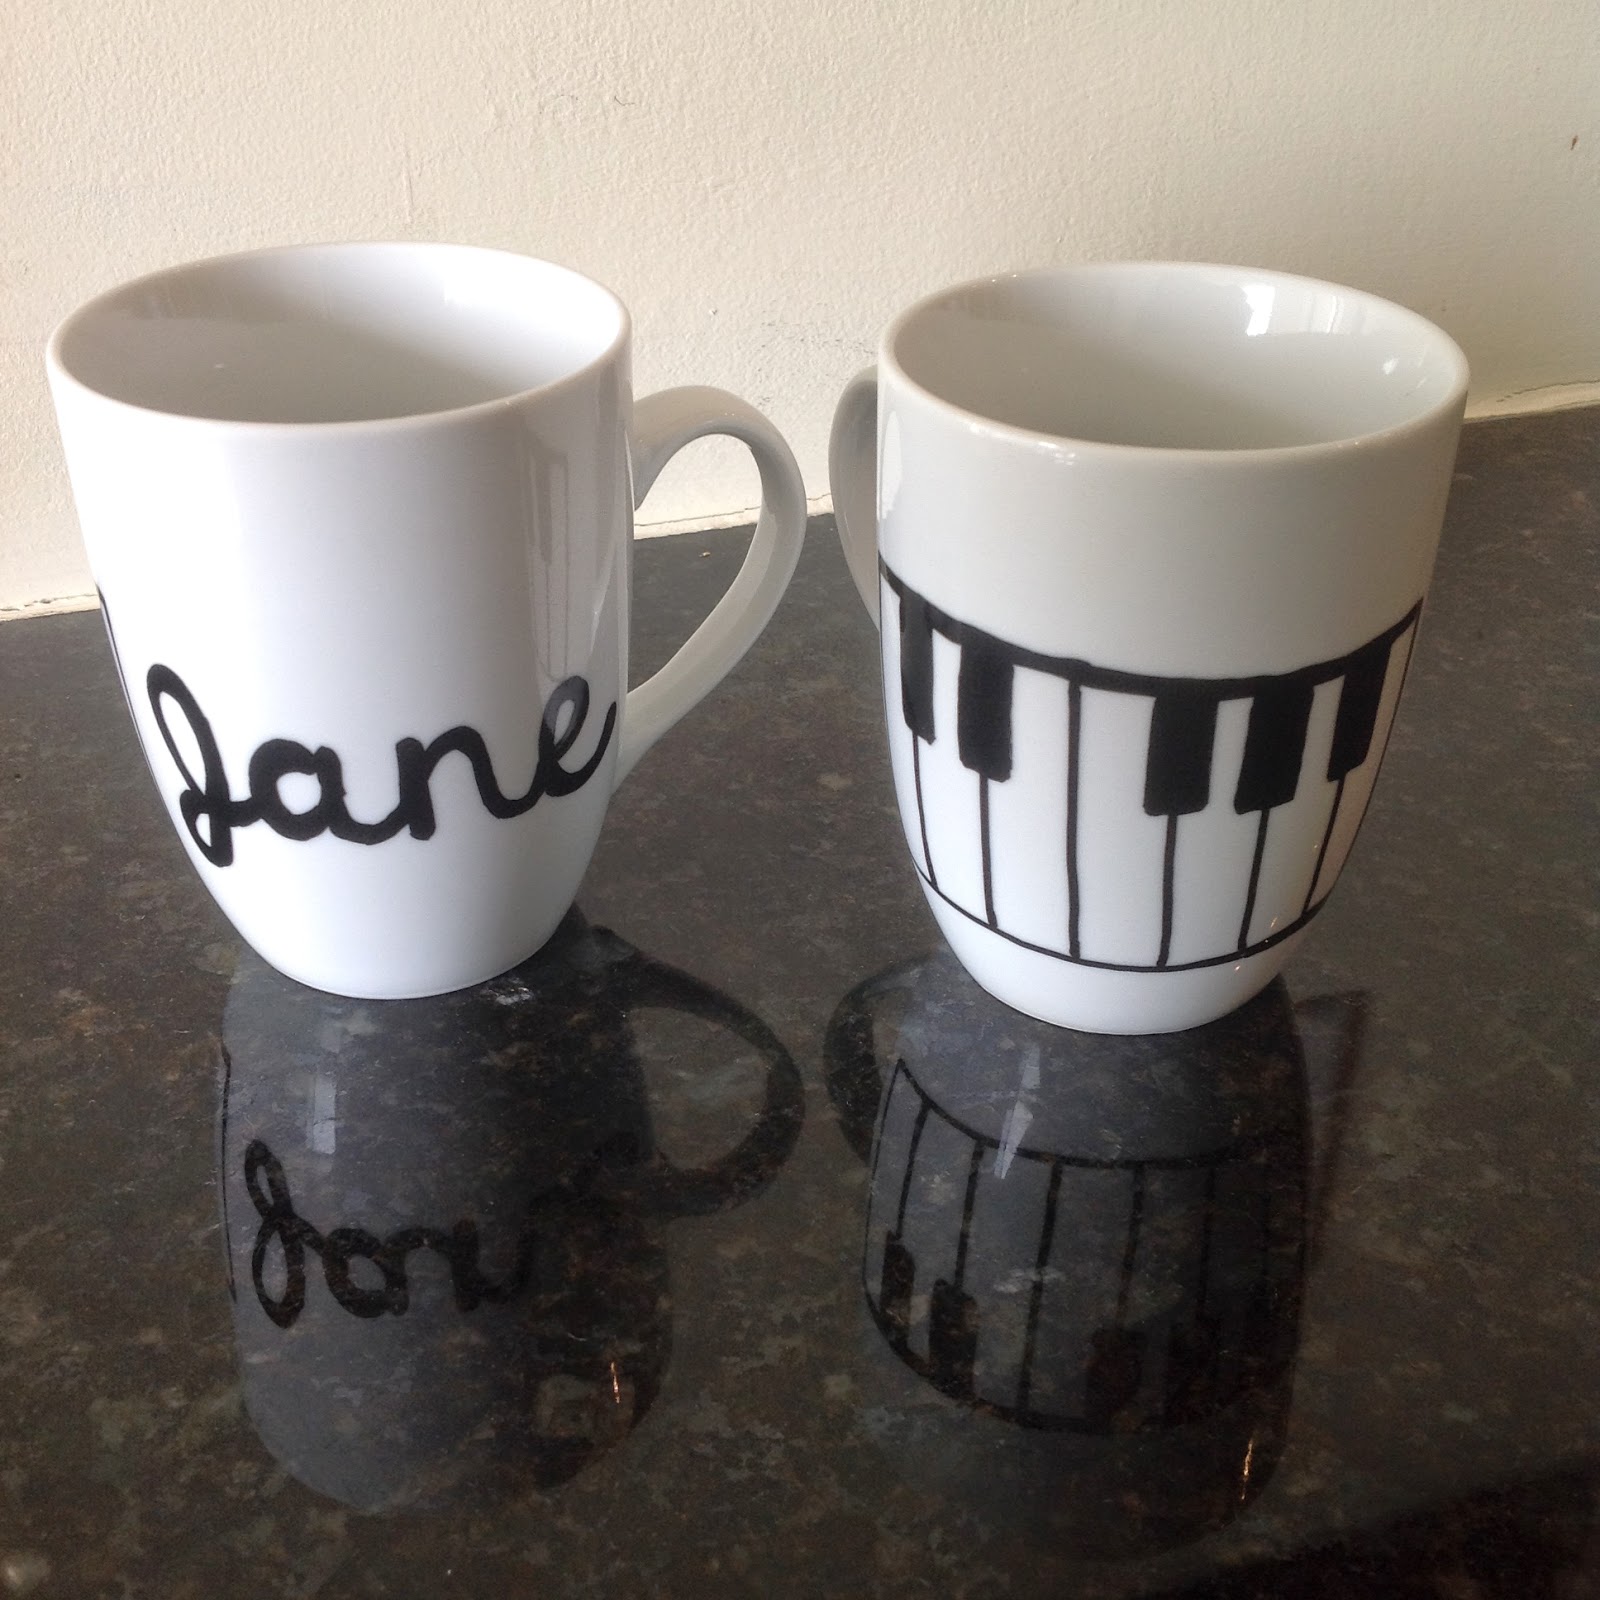
Having seen DIY Sharpie Mugs for a long long time now on Pinterest, and in other bloggers' projects, it's surprising to me that I've actually never tried it! So now was the time!
A black and white piano, using a black oil-based Sharpie on a white mug... I liked the idea of a distinct image on the white mug, and then to take it to the next level for my students - to personalise it for each of them. That was my favourite part, and definitely their favourite part when they opened their gifts! It worked especially for those students who were siblings because the mugs were individual for each of them :)


I read many posts about the DIY Sharpie projects, and saw how most of them were similar enough, but each had something slightly different they did about them. I'll tell you how I did it, and how I combined many elements of the "usual" way I found, and chose my own way as I went along as well.
What you'll need (weird not to be writing 'Ingredients' here!):
Oil-based Sharpie pen in colour of your choice - I purchased a Fine Black pen from Michaels, with 40% off of course!
Plain white mug - I read a lot that the cheaper the better - I got 3 packs of 6 plain white mugs for $10 from Canadian Tire.
Before I bought the mugs, I put together a word document with my students' names on in 3 different fonts, some to match personalities, others that fit the style of font with the name itself! I chose these fonts which I had previously downloaded free: 'Hello Heartache', 'Girls Have Many Secrets' and 'KG When Oceans Rise'. In the end I only used these as a reference as I copied the font, and used them as a guide on sizing too.
Directions (Method?!):
1. Wash the mugs in soapy water, rinse and leave to dry. Make sure the mugs are completely dry to make you start.


2. Decide on your image, and using the Oil-Based Sharpie Paint Marker just let it happen! You could etch out the design with eyeliner (as I found when I researched), or even try a pencil transfer from a printed design, but I used the printed names as a guide for sizing, marked where I wanted to start and finish, and then freestyled the rest.

3. Once the names were done, it was piano time. I'm lucky - I have drawn an octave of a piano MILLIONS of times in my life! It was easy to draw freehand, just using a random rectangle (in fact, a pack of stamps!) for the sizing, and then colouring in the black keys by eye.

4. The paint pen did appear to dry just as I worked on each mug (I did 4 the first day, 11 the next, and 3 the final day of DIY-ing - I always had to stop and leave for work!). Then, placing the mugs on a baking sheet - so they are not touching, place in a cool oven and turn the oven on to 450°F.


Careful not to pre-heat the oven before you put the mugs in. The gradual heating of the oven helps the mugs adjust to the heat, to slowly heat up and to keep everything from cracking.
5. Bake for 30 minutes, then turn off the oven and leave to cool without opening the oven door.
*** Whilst my mugs were baking, especially the day there were 11 mugs in there, the smell did get quite toxic! Luckily, with both the oven fan, and our unit's fan on, and a sunny balcony to go and sit on, it was okay - but do be wary of this if you're in a small space, or are doing a lot of these! I don't know if it is anything super toxic, but the smell was not great, and I felt like it was not the best to sit inside while it smelt so pungent! ***

6. When the mugs have completely cooled (and for me, overnight) - wash in warm, soapy water again and leave to dry.

7. Go over any patches of the black design that might have cracked, or be more faded than the rest. Some of the black piano keys needed a second coat of the paint marker, and some of the thicker parts of the names - but it was super easy to go over a second time.
8. Do a second bake in the oven, again placing them in a cool oven, turning on to 450°F, baking for 30 minutes and then leaving them to cool completely. When cooled, give them another wash in warm, soapy water.

So there were many different thoughts on whether these mugs could be dishwasher safe or not. My research on everybody's different blog posts on the project lead me to believe, that yes, if you use the oil-based Sharpie paint markers, and do at least 1 bake in the oven, they are likely to be dishwasher safe. In my two hand-washings of the mugs there were no problems at all, I just haven't been brave enough to try the dishwasher yet! 
I marked up the tags (that had a special note to each of my students telling them I'd miss them a lot!) as Hand Wash Only, just as a precaution, and then stuck one of my Sew Lah Tea Dough stickers on too!
A double wrap in tissue paper to keep them safe as I took them to student's houses, and schools, placed in white paper bag, with a strip of piano tape I have had in my craft box forever, and they were ready to go!

17 DIY mugs made, as of today, 11 given out, and 6 more to go before my time teaching all of these amazing students is over :-( I am SUPER happy with how much they have all loved the mugs. Many have finished their lessons to run to their Mum/Dad and show them their new mug with their name on it... YEY! That's a good feeling! Hopefully they'll be able to keep them forever, and always enjoy their piano lessons.


Now I have tried this DIY Sharpie project, I cannot wait to do it more!! New colours, new designs... I already have one in mind for the Summer time, you'll just have to wait and see how that one turns out.

I'd totally recommend this project for anyone! The Sharpie pens make it easy to design and draw with, as you're holding a pen - not a paintbrush! Keep the design simple and it will be totally effective - it's shiny and well glazed and looks professional (at least to my 10 year old students!!).
♫ ♫ ♫ ♫ ♫ ♫ ♫ ♫ ♫ ♫ ♫ ♫ ♫ ♫ ♫ ♫ ♫ ♫ ♫ ♫ ♫ ♫ ♫ ♫ ♫
Good luck to all of my students in their future musical endeavours and piano playing... I am going to miss you all A LOT and hope to always keep in touch!


