Sunday, 3 March 2013

March Break Piano Challenge

1 week to go!!  I am totally ready for March Break to be here.  Don't get me wrong, I love my students and I love working hard for them but it seems like a long time since the Christmas holidays and I am excited for the time off :-)

I am always looking for fun ways to teach piano... I often play games, do worksheets and encourage practice in a variety of ways so that the kids can truly find something that works for them and means that they enjoy playing as well as learn from it.    In teaching my main aim is for children to learn to love music, not only the specific pieces and techniques, but to develop an overall passion for music.

With March Break coming up, this year I have 1 complete week off teaching (yey!) and then in addition to this many of my students have an extended break from school and will not be having lessons for 2 weeks.  So once I have seen my students this week, it might be 3 weeks before we have a lesson again... seems like a long time!

I was thinking back to when I was a kid and when the libraries used to run reading challenges in the Summer holidays.  I loved to read and finishing x number of books per Summer break was never a problem for me, but I did love filling in the book titles, mark out of 10 I gave each one for it on the challenge sheet!

That was my inspiration for the piano challenge I have put together for my students.

I decided on a 14 day challenge filled with different ways to encourage playing over the break.  Picking favourite songs, a couple of performances, revising old/easy songs, improvising and composing a new ending to a song, playing in pyjamas, playing in the dark, switching hands etc... On one day they even have a challenge to teach their parents a song!!


If they complete the challenges, there will of course be a tasty treat for them at their first lesson back after the break :-)

I included a note to parents (mainly for the parents I don't see) to explain it, and hopefully get them on board in encouraging their children to enjoy playing and completing the challenge!

Thanks to Joy at Color In My Piano for your post showing me these great musical fonts I used for the title.

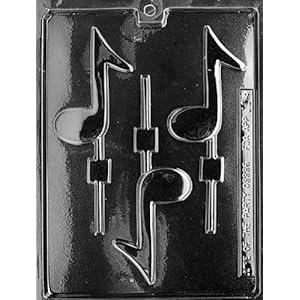
I also ordered these music chocolate lollipop molds from Amazon to have some fun with over March Break and get them ready for everybody who deserves one!  I'll be sure to add some photos of this when they're done in a couple of weeks.


Please feel free to download the PDF for the March Break challenge, let me know if you need it to read 'Spring Break', 14-day challenge or something else - I'll likely be making a more general one soon anyway but for now, March Break is coming :-D

Have a great last few days before the break (if you get one?!) - let me know what musical or crafty things you'll be getting up to in March ♫

Monday, 25 February 2013

A February Round-Up: Valentine Hearts, Pasta and Truffles!

With February coming to an end this week, March seems to have RUSHED here and the months are flying by.  To be honest, I would love some more snow before Spring comes but I am excited for new crafty and baking plans I have coming up!

Before the month is out I wanted to blog a few photos and ideas both my husband and I have been working on over Valentine's Day and with his new Pasta Maker attachment for our stand mixer :-)

First up is my crafting for Valentine's Day.  During Movember moustaches (see them here or buy them here!) and over Christmas I discovered a love for felting and stuffing!  I decided Valentine's Day would need something like this too, and with my new pinking shears (thanks Mum!) I got to work.

I chose some less Valentine-like colours for Jonathan, the darker red, grey and black (with just a little sparkle) rather than the pinks and reds we see all over the stores in February!


Using a heart cookie cutter I was able to trace the shape of 12 hearts per page of felt and so ended up with 36 heart shapes that I could then cut out, piece together, sew, stuff and then close up!!  And voila 18 hearts!


On Valentine's Day morning I left 1 in a jar to add a little intrigue... he knew what they were but not where they were!  I had hidden these little hearts (I like to call them 'pocket sneakers') all over our apartment... And now, nearly 2 weeks later he still has a few to find but the jar is getting fuller!

Now most are found, they're perfect for Valentine's decorations, or for sneaking into pockets or bags, or somewhere fun just to say I love you! (...I found one in my glasses case just the other day!)


Moving on to some foods... For Jonathan's birthday this year he received the Kitchen Aid stand mixer pasta attachment and he tried it out for the first time on Valentine's Day.  Incredible to have fresh made pasta when you get home from work late in the evening, along with his amazing veal milanese.  He really had been hard at work all day!!  He even made a four cheese stuffed, heart shaped ravioli, who knew his creativeness would be that cute :-P


For the pasta dough he used Jamie Oliver's recipe (click here).  Yes it says it serves 6, and yes there are only 2 of us - but the amount he made meant we got the heart shaped ravioli for dinner that night, a few leftover for lunch the next day and then the remaining dough we made into linguine a few nights later which served us twice more!!  A great recipe if you want lots of dough to try different things with, or if you're giving away some of the pasta/saving for later in the week!

Not that I can claim to any of the cooking that night, but I can however share the links he used to make my delicious meal!  He used the Food Network recipe from Giada for the Veal Milanese, and also her Vodka Sauce from this recipe (minus the penne!), and then for dessert he made a chocolate truffle mix which we could make our own truffles with!!  He used Alton Brown's recipe with a few tweaks... Sherry instead of brandy, and in fact he refrigerated the whole mix in a dish and we did our own scooping and coating with a choice of powdered sugar, cocoa powder, crushed pistachios and my FAVOURITE - crushed Amaretti biscuits :-)


Valentine's Day was so fun and very delicious!  And it left us with lots of leftovers and ideas of things to try next...


We made Jonathan's family some truffles and delivered them to church... We ate pasta for a good few days afterwards, and I got to try out the pasta cutter when we made our linguine, and we have also since made a fresh pasta lasagna!  SO GOOD!


A few days of linguine and sauce leftover from Valentine's Day and then this week's lasagna!


So here we are, novice pasta makers...expert eaters... and with our heart filled house this Valentine's Day and month! ♥

Hope you've all had a great February celebrating!  Let me know what you've been working on this month, I'd love to see :-)

Sunday, 17 February 2013

Sunday Tea Cakes

Happy Family Day weekend to everybody here in Canada... Presidents' Day for my US readers... And a happy start of the Half-Term holiday of which I am the most jealous of, to all of my UK friends and family :-D

However jealous of a full week off work I am, I am still very excited to have my long weekend!  So far we have enjoyed pasta and truffle making (another post coming soon...) and my first time out cross country skiing and tubing - wow, so much fun but I definitely fear for sore limbs some time soon...  Still to come, brunch on Family Day and some general chilling out enjoying the extra day to the weekend!

After returning back from our outside adventures yesterday, I tried out our tea cake plaque pan we bought a good few months ago from Williams Sonoma (thank you wedding gift cards once again!) and hadn't tried yet!

With a church luncheon today it was a perfect opportunity to try it.  They are such pretty designs, little bite sized cakes that would make a great platter to take with us.

To create this recipe I investigated how this tea cake plaque pan worked and read a few contradictory reviews - some saying you needed to grease the pan, some that said you didn't, some people who liked the recipe that came with the pan, others had complaints... Hmm, what to do then!?

In the end I found a recipe for Apple Madeleines I changed up to be lemon - my flavour of choice in everything I do!  ... I also included a glaze on top of the cakes for extra juiciness.  

We may have tasted a couple last night, but the rest are out on the sweet table, right about now... 


Here's the recipe I used and what you'll need (thanks Good Housekeeping Cakes and Bakes recipe book):

For the Madeleines

150g unsalted butter, melted and cooled, plus extra to grease (I actually sprayed with cooking spray and added a sprinkling of flour as the recipe that came with the pan suggested this)
2 tbsp honey, added to the butter after melting
3 large eggs
150g caster sugar (I used granulated as caster is hard to find here, and it was fine...or should I say superfine?!)
150g plain flour, sifted
1/2 tsp baking powder
Grated zest of 1 lemon

For the Glaze (not from the original recipe)
3 rounded tbsp icing sugar
Juice of 1 lemon

Directions

1.  Preheat oven to 200°C (392°F).  Grease the madeleine tins or in my case, the tea cake pan.
2.  Beat the eggs and caster sugar together until pale and thick (this should take about 8 minutes).  I used our Kitchen Aid stand mixer mostly on speed 2 for 7 minutes and 1 extra minute on speed 4 and it had become pale and thick as it suggested :-)
3.  Quickly, but gently fold in the flour, baking powder and lemon zest, followed by the melted butter and honey mixture, making sure the butter doesn't settle at the bottom of the bowl.
4.  Spoon the mixture into the tins.  Bake for 8 - 10 minutes until golden then remove from the tins and cool on a wire rack.
5.  Store in an airtight container for up to 2 days. 

6.  Prepare the glaze while the cakes are cooking so that you can pour onto the cakes while warm - whisk together the icing sugar and lemon juice until all of the sugar and any lumps have dissolved.  Spoon or pour over cakes while warm.

A recent investment brought me to the OXO Good Grips cookie scoop, something I thought I would never need until the addition of a mini muffin tin to my collection.  So I bought one and it has already proved very helpful! For this cake pan, it was suggested on the recipe that came with the pan that 2 teaspoons of batter would be a good amount, and hey guess what - the cookie scoop was 2 teaspoons, yey!  This made this much easier to get even portions in each mini cake :-)

We got our pan from Williams Sonoma but we've also seen them at Home Outfitters!!  The cakes popped out SO easily although the pan was very very hot (coming out of a 390°F oven, I guess that goes without saying however!).

I LOVE how cute they look, and it could make for a really easy 30 mini cake quick batch to whip up, perhaps with a little sprinkling of icing sugar on top?


Have a great long weekend everyone, thanks for reading!

Monday, 11 February 2013

♥ Valentine's Day Piano Worksheets ♥

Valentine's Day is coming and starting tomorrow afternoon I will be taking along my musical Valentine's Day worksheets for all of my piano students along with a little pencil for them to use and keep!

I wanted to give them a little treat but also develop some of my own worksheets this year.  I started off with my Composer Love Stories - telling them stories about composers, their wives, children, songs they wrote for them and then also mentioned some things about the 'Romantic' Period of music of course!  To finish off this worksheet I did a little matching quiz to check to see if they really had read it all.  Then I realised I needed more.  A worksheet or two that would also be suitable for my much younger students!  A Love Story to write, and you'll see I suggested they write it about music, or from their piano's perspective because really, which 6 year old will tell their piano teacher which boy they love at school?!  And then finally, for all of the students that need quizzing on their notes on the staff, they can fill them in on the Love Note Staff Hunt hearts.

For Composer Valentine Love Stories just click for the PDF!


I bundled it all together, added a heart I cut out from music scrapbook paper, holes punched on either side and a pencil slotted through so it holds together.  I used just curling ribbon we had a large roll of to tie it all together.


Just a little note:  I purposefully do my documents in black and white only.  I LOVE everybody's worksheets in colour, they look amazing, but for little piano teacher me trying not to print like crazy all the time I thought it would be good to stick to black and white for my worksheets this time (as my printer just ran off 75 sheets for this week!)... And well, my students love to colour anyway :-)

For when I am printing in colour (and I do that a lot too!) here is a great list of printer cost saving tips from amazing piano blogger Susan Paradis with her latest blog post - just click here!

I think we'll be having a lot of fun with it this week, please feel free to download these documents and let me know how you used them too!

♫ Happy Musical Valentine's Day ♫

Friday, 8 February 2013

Harry Potter Music Challenge ♫

What a crazy day!  I am home now after what has been my most Wintery experience in Toronto ever... and I LOVED it!  Trudging through knee deep snow, it all definitely falling into my boots was totally awesome!  Music classes in the morning, and then back to the same area for piano lessons in the evening.

And that is what brings me to this post's subject!  I had an email from a parent just yesterday telling me her son had been invited to audition for a choir school in the area - great news you might think! Not for the young boy who wasn't sure about this whole 'vocal' audition!  Mum still wanted to see if he might get used to the idea and do the audition so asked for some secret help from me!

She asked if we could work on elements of the audition without him knowing exactly why.  Now some of them were ear training exercises we often do during class anyway so I knew that wouldn't be a problem but the voice specific performances or exercises I felt he may be less inclined to do.

Until Mum mentioned something that just sent ideas whirring.. "If only Harry Potter were in a choir, there would be no problem!  That's why he liked the exam idea, because they have exams at Hogwarts! Sigh..."

And for anybody who knows me also knows I LOVE Harry Potter too so I thought maybe there was something more I could do to introduce some of these exercises in a fun way :-)

I have a bunch of Harry Potter stickers, and the kids LOVE getting stickers especially as part of a challenge so that's where I began.

I came up with 6 challenges, some that were part of the vocal audition process he may go through... Others were performance or improvisation based.

Check out the PDF document here.


Thank you MuggleNet for this awesome insight into Harry's piano playing ability!  Who knew?!

After making and printing these (2 copies this time, as both Harry Potter obsessed brother and sister would be doing the challenge!) I realised what I could do to make this MORE awesome for the kids...

... A HOGWART'S LETTER!!!  Inviting them along to the music challenge the night before to give them something to look forward to in the next lesson.  Luckily their house was on my way home from that evening's piano lesson so this was easy to do - alternatively I thought I could have also asked a parent to print the attachment and leave it for them.

But as I did it myself I was also able to tea-stain the letter (after a nice warm cup of tea of course!) and give it an old letter feel that I'm sure the real Hogwart's letters were like!

Here's the PDF I made for the Hogwart's letter - gaps for name, date, time, location and teacher's name so you can fill them in as needed!  Just click here!


So after an email request, and quickly whipping this together I definitely was getting excited about it!  ...We had a LOT of fun in today's lesson, they all completed their challenges, got their stickers and one of my student's even dressed in her Halloween Harry Potter robe for the challenge!  Loved it!


♫ We'll definitely be doing this challenge again! ♫


Sunday, 3 February 2013

It's your Birthday and it's the Super Bowl!!

A BIG Happy Birthday today to my husband Jonathan who is lucky enough to have his birthday on Super Bowl Sunday for real this year!

We're celebrating with his family and watching the game later on, but here's a quick post to let you know what cake we'll be eating!

After last year's Game Night birthday cake I was wondering what I could do this year... Cue some crazy ideas way above my station and off I went!  I was drawing ideas for days, planning the flavours of cake and the buttercream fillings... My ideas are definitely TOO crazy sometimes and there are things I should probably realise I cannot get done on a Saturday after work in the morning, with a music birthday party for a 3 year old in the afternoon, but alas - Sunday morning has arrived and I am still alive and did get 6 hours sleep!

Here's how it looks...

Super Bowl/ Birthday cake with Jonathan's favourite
things to top it off!
Popcorn was the only non-cake non-icing thing here!
I couldn't have a Super Bowl cake without
a ball now could I!?
A few shots with my macro lens!


Ravens vs. 49ers colours :-) 

SO pleased with how this turned out!  

A basic run-down on the flavours before I go...

Bottom (pitch....hmm field?) layer - Red velvet Cake with Buttercream filling.

Middle (team colour) layer - Vanilla cake with Vanilla syrup, Buttercream and cherry filling.

Top (Coke!) layer - Chocolate cake with Salted Caramel Buttercream filling.

I promise to write about the recipes I used later on and add in some links, but for now there's a birthday party to get to!!

♥ HAPPY BIRTHDAY JONATHAN ♥

Hi again, some updates on recipes and what was what now the craziness of a birthday filled weekend is over!

For the bottom layer that made up the Super Bowl field I used Red Velvet Cake that came from the Joy of Baking blog here.  I have always used this recipe, many times before and love it.  It is dense, moist and just so good!  Never needed any other recipe.  I thought this would be a great cake for the bottom layer of the cake to make sure it was sturdy enough to hold tiers on top of it.

I filled the cake with regular vanilla buttercream, a ratio of 300g icing sugar and 175g butter but double or triple depending on how much you need, and pure vanilla essence to taste - around a teaspoon for that amount.

For decoration I used Wilton fondant and did a LOT of rolling out!  I coloured most of it light green but then added a dark green touchdown strip, and then white strips, slightly thicker for the 50 yard line and then thinner ones for the other yard lines.  Originally I planned on writing the numbers on the cake as well but once it was done I decided to leave it as it already was quite full of stuff and didn't want to overcrowd the cake!


Tier number two was the Vanilla cake that also had vanilla syrup through it making it also nice and dense and very moist and yummy.  Find that recipe here from BBC's Good Food.  I always prefer using grams to cup recipes and I KNOW I can trust a British recipe for this :-)  I cooked it in a 6-inch springform pan and it required a little less time than it suggested but just keep an eye on it!

I filled this one with more of that vanilla buttercream, but to this one I also added glace cherries - halved and placed on top of the buttercream filling.  Jonathan LOVES cherries so this was all for him!

To cover this one I coloured the fondant icing with red and blue/purple and cut them into strips for the team colours for this year's Super Bowl.  And hey, researching this meant I now knew who was playing!


To top of the cake I made 2 coke cans out of Chocolate Victoria Sponge - which I wouldn't use again not for the recipe, which was yummy but tooooo spongey and soft to work easily with.  

I filled this one with Salted Caramel Buttercream and of course I have lots left over because I just made 2 cans using my empire cookie cutter but it tasted good, nice and sweet!

I covered the taller can with grey tinted icing and the smaller coke can with more of the red fondant icing.  To create the can look I used food writing markers to do the Diet Coke font and then used white writing icing to colour in the swooshy line for the Coca-Cola effect.  

Finishing touches was the popcorn around the top edge (Coke and Popcorn - it's the Super Bowl right?!)... the grass piped green buttercream using my grass tip and piping bag... and some brown all fondant superbowls with white chocolate writing icing pen stitching :-)


A BIG project, maybe my biggest and best fondant cake yet!  Half was eaten up at the party last night, just enough left to enjoy just the two of us this week!!


Monday, 28 January 2013

Winter Scene Christmas Cakes

Merry Christmas everybody! ... At least, it was!  All the decorations are down, and the cake is (almost!) all eaten but the post about my Christmas Cake still remains to be written, and read!


This was my second year of Christmas Cakes after the debut in 2011 using my Mum's recipe.  This year I added a little ingredient of my own so now I can say I have my own spin on her yummy fruit cake :-)  

This year I began the fruit cake process on November 1st, soaking the fruit in sherry for a couple of days first before baking.  Last year I did 2 large round cakes and 2 small round ones (you can find last year's cakes and designs here) but this year was going to be a little different.  We were heading over the Atlantic to England to spend Christmas with my family for 2 weeks and I knew I DEFINITELY wanted to treat my family to cakes now I have tried to make them myself!  So I made 1 large round cake (for us!), 1 large traybake that I would split into 4 small rectangles, and then the remaining cake mixture into a loaf pan that would make 2 smaller square cakes.

That was a lot of cake for one day!  And then, 7 weeks later after the occasional tipple of sherry (for the cakes, not me!) it was time to marzipan and ice and of course decorate!

My issue this time was how could I decorate the cakes in a way that could travel 3422 miles without getting squashed, broken or completely destroyed in transit.  I thought that perhaps it was time to try some piping and maybe some white on white winter scenes would look good.  I am MORE than pleased with how they turned out and glad the designs (mostly) worked the way I had planned them.

My Grandparents and Aunts & Uncles that we spent Christmas with all got personalised designs that I knew (or at least, hoped) they would love!  Here they are...  

A snowy tree scene for my Granny!
For my bird-loving Grandma, a truly Canadian Cardinal!
For Lara and my Grandad!  Lara was getting married over the
Christmas season so although she did not have a wedding ceremony
amidst trees and snow I used a little artistic license here!
For my Aunt and Uncle who live out in a little cottage in the
hills with the sheep just like this one!
Some carol singers for my musical Auntie Jo and family :-D
And there's a little story behind this one that was for my
parents and siblings! ...

So the photo above shows some classic Muskoka chairs sat in the snow and overlooking a small lake.  I actually based this design on our Christmas card photo that we took and used to send out to our friends and family this year!  We took the photo in March 2012 up in Port Carling, Muskoka when we were on the hunt for some snow as Toronto was definitely lacking last year!

Here's the photo to compare my cake to the real photo!


I had a LOT of fun doing all of this piping, and after making sure I got my family's done with no stress or tears I made a start on our own cake as we were not prepared to give away all of my hard work - there had to be something yummy in it for ourselves as well!!

I tried drop icing for the first time ever (so please any tips/ feedback are welcome!) and combined a little of my favourite parts of the other designs and here's how it ended up...


Although the time for Christmas style fruit cake might be over for most of you (I know Jonathan could eat it all year round however!)... the Winter scenes I designed and piped might still be seasonally appropriate!?  I'd love to hear your comments and here's a belated Merry Christmas for 2012!!!!

Oh and in case anybody is wondering... the cakes ALL made it safely across to the U.K!  They survived a 50 person plane from Toronto - Philadelphia, a 6 hour wait in Philadelphia airport and then a long 8 hour night flight to Manchester.  Thank you to multiple tins, a holdall in carry on luggage and my amazing husband for carrying 6kg of Christmas Cake perfectly level and safely across to England for what could be (once they had arrived safely) a wonderful Christmas!!